# 텍스처와 바인드 그룹
지금까지 우리는 매우 간단한 모양만 그려왔습니다. 삼각형만으로 게임을 만들 수도 있지만, 매우 상세한 객체를 그리려고 하면 게임을 실행할 수 있는 기기가 크게 제한될 것입니다. 하지만 **텍스처(textures)**를 사용하면 이 문제를 해결할 수 있습니다.
텍스처는 삼각형 메시에 겹쳐 씌워 더 상세하게 보이도록 만드는 이미지입니다. 노멀 맵, 범프 맵, 스페큘러 맵, 디퓨즈 맵 등 여러 종류의 텍스처가 있습니다. 우리는 여기서 디퓨즈 맵, 또는 더 간단하게는 색상 텍스처에 대해 이야기할 것입니다.
# 파일에서 이미지 불러오기
메시에 이미지를 매핑하려면 먼저 이미지가 필요합니다. 이 행복한 작은 나무를 사용해 봅시다:
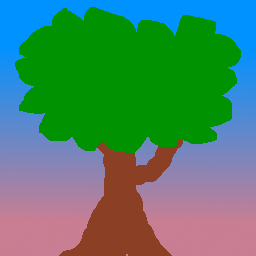
image 크레이트 (opens new window)를 사용하여 나무 이미지를 불러올 것입니다. 의존성에 추가해 봅시다:
[dependencies.image]
version = "0.24"
default-features = false
features = ["png", "jpeg"]
image에 포함된 jpeg 디코더는 rayon (opens new window)을 사용하여 스레드로 디코딩 속도를 높입니다. WASM은 현재 스레드를 지원하지 않으므로, 웹에서 jpeg를 불러올 때 코드가 충돌하지 않도록 이 기능을 비활성화해야 합니다.
WASM에서 jpeg를 디코딩하는 것은 성능이 좋지 않습니다. WASM에서 전반적인 이미지 로딩 속도를 높이고 싶다면, wasm-bindgen으로 빌드할 때 image 대신 브라우저의 내장 디코더를 사용하도록 선택할 수 있습니다. 이를 위해서는 Rust에서 <img> 태그를 만들어 이미지를 가져오고, <canvas>를 만들어 픽셀 데이터를 얻어야 하지만, 이는 독자 여러분을 위한 연습 문제로 남겨두겠습니다.
State의 new() 메서드에서 config를 선언한 직후에 다음 코드를 추가하세요:
let config = wgpu::SurfaceConfiguration {
    usage: wgpu::TextureUsages::RENDER_ATTACHMENT,
    format: surface_format,
    width: size.width,
    height: size.height,
    present_mode: surface_caps.present_modes[0],
    alpha_mode: surface_caps.alpha_modes[0],
    view_formats: vec![],
    desired_maximum_frame_latency: 2,
};
// 새로운 코드!

let diffuse_bytes = include_bytes!("happy-tree.png");
let diffuse_image = image::load_from_memory(diffuse_bytes).unwrap();
let diffuse_rgba = diffuse_image.to_rgba8();

use image::GenericImageView;
let dimensions = diffuse_image.dimensions();
여기서는 이미지 파일의 바이트를 가져와 이미지로 불러온 다음, RGBA 바이트의 Vec으로 변환합니다. 또한 실제 Texture를 만들 때 사용할 이미지의 크기도 저장합니다.
이제 Texture를 만들어 봅시다:
let texture_size = wgpu::Extent3d {
    width: dimensions.0,
    height: dimensions.1,
    // 모든 텍스처는 3D로 저장되므로, 2D 텍스처는 깊이를 1로 설정하여 표현합니다.
    depth_or_array_layers: 1,
};
let diffuse_texture = device.create_texture(
    &wgpu::TextureDescriptor {
        size: texture_size,
        mip_level_count: 1, // 잠시 후에 자세히 다룰 것입니다.
        sample_count: 1,
        dimension: wgpu::TextureDimension::D2,
        // 대부분의 이미지는 sRGB를 사용하여 저장되므로 여기서도 이를 반영해야 합니다.
        format: wgpu::TextureFormat::Rgba8UnormSrgb,
        // TEXTURE_BINDING은 wgpu에게 이 텍스처를 셰이더에서 사용하고 싶다는 것을 알립니다.
        // COPY_DST는 이 텍스처에 데이터를 복사하고 싶다는 것을 의미합니다.
        usage: wgpu::TextureUsages::TEXTURE_BINDING | wgpu::TextureUsages::COPY_DST,
        label: Some("diffuse_texture"),
        // SurfaceConfig와 동일합니다. 이 텍스처에 대한
        // TextureView를 만드는 데 사용할 수 있는 텍스처 형식을 지정합니다.
        // 기본 텍스처 형식(이 경우 Rgba8UnormSrgb)은 항상 지원됩니다.
        // 다른 텍스처 형식을 사용하는 것은 WebGL2 백엔드에서 지원되지 않습니다.
        view_formats: &[],
    }
);
# 텍스처에 데이터 넣기
Texture 구조체에는 데이터와 직접 상호 작용하는 메서드가 없습니다. 하지만 이전에 만들었던 queue의 write_texture 메서드를 사용하여 텍스처를 불러올 수 있습니다. 어떻게 하는지 살펴봅시다:
queue.write_texture(
    // wgpu에게 픽셀 데이터를 어디에 복사할지 알려줍니다.
    wgpu::TexelCopyTextureInfo {
        texture: &diffuse_texture,
        mip_level: 0,
        origin: wgpu::Origin3d::ZERO,
        aspect: wgpu::TextureAspect::All,
    },
    // 실제 픽셀 데이터
    &diffuse_rgba,
    // 텍스처의 레이아웃
    wgpu::TexelCopyBufferLayout {
        offset: 0,
        bytes_per_row: Some(4 * dimensions.0),
        rows_per_image: Some(dimensions.1),
    },
    texture_size,
);
예전에는 픽셀 데이터를 버퍼에 복사한 다음 텍스처로 복사하는 방식으로 텍스처에 데이터를 썼습니다. write_texture를 사용하는 것이 버퍼를 하나 덜 사용하므로 조금 더 효율적입니다. 하지만 필요할 경우를 대비해 예전 방식도 여기에 남겨두겠습니다.
let buffer = device.create_buffer_init(
    &wgpu::util::BufferInitDescriptor {
        label: Some("Temp Buffer"),
        contents: &diffuse_rgba,
        usage: wgpu::BufferUsages::COPY_SRC,
    }
);

let mut encoder = device.create_command_encoder(&wgpu::CommandEncoderDescriptor {
    label: Some("texture_buffer_copy_encoder"),
});

encoder.copy_buffer_to_texture(
    wgpu::TexelCopyBufferInfo {
        buffer: &buffer,
        offset: 0,
        bytes_per_row: 4 * dimensions.0,
        rows_per_image: dimensions.1,
    },
    wgpu::TexelCopyTextureInfo {
        texture: &diffuse_texture,
        mip_level: 0,
        array_layer: 0,
        origin: wgpu::Origin3d::ZERO,
    },
    texture_size,
);

queue.submit(std::iter::once(encoder.finish()));
bytes_per_row 필드는 약간의 고려가 필요합니다. 이 값은 256의 배수여야 합니다. 자세한 내용은 gif 튜토리얼을 확인하세요.
# TextureView와 Sampler
이제 텍스처에 데이터가 있으니, 이를 사용할 방법이 필요합니다. 여기서 TextureView와 Sampler가 등장합니다. TextureView는 텍스처에 대한 *뷰(view)*를 제공합니다. Sampler는 텍스처가 어떻게 샘플링되는지 제어합니다. 샘플링은 GIMP/Photoshop의 스포이드 도구와 비슷하게 작동합니다. 프로그램이 텍스처 위의 좌표(텍스처 좌표라고 함)를 제공하면, 샘플러는 텍스처와 일부 내부 매개변수를 기반으로 해당 색상을 반환합니다.
이제 diffuse_texture_view와 diffuse_sampler를 정의해 봅시다:
// 텍스처 뷰는 많이 설정할 필요가 없으므로,
// wgpu가 기본값으로 정의하도록 둡시다.
let diffuse_texture_view = diffuse_texture.create_view(&wgpu::TextureViewDescriptor::default());
let diffuse_sampler = device.create_sampler(&wgpu::SamplerDescriptor {
    address_mode_u: wgpu::AddressMode::ClampToEdge,
    address_mode_v: wgpu::AddressMode::ClampToEdge,
    address_mode_w: wgpu::AddressMode::ClampToEdge,
    mag_filter: wgpu::FilterMode::Linear,
    min_filter: wgpu::FilterMode::Nearest,
    mipmap_filter: wgpu::FilterMode::Nearest,
    ..Default::default()
});
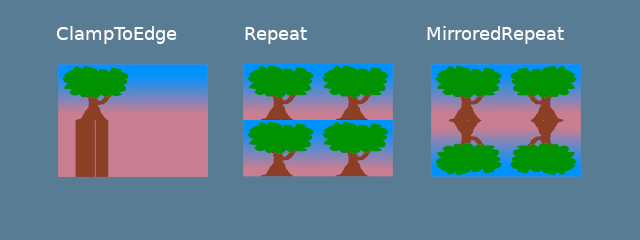
address_mode_* 매개변수는 샘플러가 텍스처 외부의 텍스처 좌표를 받았을 때 어떻게 처리할지를 결정합니다. 몇 가지 옵션이 있습니다:
ClampToEdge: 텍스처 외부의 모든 텍스처 좌표는 텍스처 가장자리의 가장 가까운 픽셀 색상을 반환합니다.Repeat: 텍스처 좌표가 텍스처 크기를 초과하면 텍스처가 반복됩니다.MirrorRepeat:Repeat와 비슷하지만, 경계를 넘을 때 이미지가 뒤집힙니다.
mag_filter와 min_filter 필드는 샘플링 영역이 한 텍셀(texel)보다 작거나 클 때 어떻게 처리할지를 설명합니다. 이 두 필드는 보통 씬의 매핑이 카메라에서 멀리 있거나 가까이 있을 때 작동합니다.
두 가지 옵션이 있습니다:
Linear: 각 차원에서 두 개의 텍셀을 선택하고 그 값들 사이의 선형 보간 값을 반환합니다.Nearest: 텍스처 좌표에 가장 가까운 텍셀 값을 반환합니다. 이렇게 하면 멀리서는 선명하지만 가까이서는 픽셀화된 이미지가 만들어집니다. 하지만 픽셀 아트 게임이나 마인크래프트 같은 복셀 게임처럼 텍스처가 의도적으로 픽셀화된 경우 바람직할 수 있습니다.
밉맵(Mipmap)은 복잡한 주제이며 나중에 별도의 섹션에서 다룰 것입니다. 지금은 mipmap_filter가 (mag/min)_filter와 유사하게 샘플러가 밉맵 간에 어떻게 블렌딩할지를 알려주는 역할을 한다고 말할 수 있습니다.
다른 필드들에는 몇 가지 기본값을 사용하고 있습니다. 어떤 값들인지 보고 싶다면 wgpu 문서 (opens new window)를 확인하세요.
이 모든 다른 리소스들은 좋지만, 어디에도 연결할 수 없다면 별 소용이 없습니다. 여기서 BindGroup과 PipelineLayout이 등장합니다.
# BindGroup
BindGroup은 리소스의 집합과 셰이더에서 이들에 접근하는 방법을 설명합니다. BindGroupLayout을 사용하여 BindGroup을 만듭니다. 먼저 BindGroupLayout부터 만들어 봅시다.
let texture_bind_group_layout =
            device.create_bind_group_layout(&wgpu::BindGroupLayoutDescriptor {
                entries: &[
                    wgpu::BindGroupLayoutEntry {
                        binding: 0,
                        visibility: wgpu::ShaderStages::FRAGMENT,
                        ty: wgpu::BindingType::Texture {
                            multisampled: false,
                            view_dimension: wgpu::TextureViewDimension::D2,
                            sample_type: wgpu::TextureSampleType::Float { filterable: true },
                        },
                        count: None,
                    },
                    wgpu::BindGroupLayoutEntry {
                        binding: 1,
                        visibility: wgpu::ShaderStages::FRAGMENT,
                        // 이 값은 위에서 대응되는 Texture 항목의
                        // filterable 필드와 일치해야 합니다.
                        ty: wgpu::BindingType::Sampler(wgpu::SamplerBindingType::Filtering),
                        count: None,
                    },
                ],
                label: Some("texture_bind_group_layout"),
            });
우리의 texture_bind_group_layout에는 두 개의 항목이 있습니다: 바인딩 0에는 샘플링된 텍스처, 바인딩 1에는 샘플러입니다. 이 두 바인딩은 FRAGMENT로 지정된 대로 프래그먼트 셰이더에서만 접근 가능합니다. 이 필드에 가능한 값은 NONE, VERTEX, FRAGMENT, COMPUTE의 비트 단위 조합입니다. 대부분의 경우 텍스처와 샘플러에는 FRAGMENT만 사용하지만, 다른 옵션도 알아두면 좋습니다.
texture_bind_group_layout을 가지고 이제 BindGroup을 만들 수 있습니다:
let diffuse_bind_group = device.create_bind_group(
    &wgpu::BindGroupDescriptor {
        layout: &texture_bind_group_layout,
        entries: &[
            wgpu::BindGroupEntry {
                binding: 0,
                resource: wgpu::BindingResource::TextureView(&diffuse_texture_view),
            },
            wgpu::BindGroupEntry {
                binding: 1,
                resource: wgpu::BindingResource::Sampler(&diffuse_sampler),
            }
        ],
        label: Some("diffuse_bind_group"),
    }
);
이 코드를 보면 데자뷔를 느낄 수도 있습니다! 이는 BindGroup이 BindGroupLayout의 더 구체적인 선언이기 때문입니다. 이 둘이 분리된 이유는 실행 중에 BindGroup을 교체할 수 있게 하기 위함입니다. 단, 교체되는 BindGroup들은 모두 동일한 BindGroupLayout을 공유해야 합니다. 우리가 만드는 각각의 텍스처와 샘플러는 BindGroup에 추가되어야 합니다. 우리의 목적을 위해, 각 텍스처마다 새로운 바인드 그룹을 만들 것입니다.
이제 diffuse_bind_group이 생겼으니 State 구조체에 추가합시다:
pub struct State<'a> {
    surface: wgpu::Surface<'a>,
    device: wgpu::Device,
    queue: wgpu::Queue,
    config: wgpu::SurfaceConfiguration,
    size: winit::dpi::PhysicalSize<u32>,
    window: &'a Window,
    render_pipeline: wgpu::RenderPipeline,
    vertex_buffer: wgpu::Buffer,
    index_buffer: wgpu::Buffer,
    num_indices: u32,
    diffuse_bind_group: wgpu::BindGroup, // 새로운 필드!
}
new 메서드에서 이 필드들을 반환하는 것을 잊지 마세요:
impl<'a> State<'a> {
    async fn new(window: &'a Window) -> Self {
        // ...
        Self {
            window,
            surface,
            device,
            queue,
            config,
            size,
            render_pipeline,
            vertex_buffer,
            index_buffer,
            num_indices,
            // 새로운 필드!
            diffuse_bind_group,
        }
    }
}
이제 BindGroup이 준비되었으니, render() 함수에서 사용할 수 있습니다.
// render()
// ...
render_pass.set_pipeline(&self.render_pipeline);
render_pass.set_bind_group(0, &self.diffuse_bind_group, &[]); // 새로운 코드!
render_pass.set_vertex_buffer(0, self.vertex_buffer.slice(..));
render_pass.set_index_buffer(self.index_buffer.slice(..), wgpu::IndexFormat::Uint16);

render_pass.draw_indexed(0..self.num_indices, 0, 0..1);
# PipelineLayout
파이프라인 섹션에서 만들었던 PipelineLayout을 기억하시나요? 이제 드디어 그것을 사용할 시간입니다! PipelineLayout은 파이프라인이 사용할 수 있는 BindGroupLayout의 목록을 포함합니다. render_pipeline_layout이 우리의 texture_bind_group_layout을 사용하도록 수정합시다.
async fn new(...) {
    // ...
    let render_pipeline_layout = device.create_pipeline_layout(
        &wgpu::PipelineLayoutDescriptor {
            label: Some("Render Pipeline Layout"),
            bind_group_layouts: &[&texture_bind_group_layout], // 새로운 코드!
            push_constant_ranges: &[],
        }
    );
    // ...
}
# VERTICES 변경하기
Vertex 정의에 몇 가지 변경이 필요합니다. 지금까지는 color 속성을 사용하여 메쉬의 색상을 설정했습니다. 이제 텍스처를 사용하므로 color를 tex_coords로 바꿔야 합니다. 이 좌표들은 Sampler에 전달되어 적절한 색상을 가져오게 됩니다.
tex_coords는 2차원이므로, 필드를 3개의 float 대신 2개의 float를 받도록 변경할 것입니다.
먼저, Vertex 구조체를 변경합니다:
#[repr(C)]
#[derive(Copy, Clone, Debug, bytemuck::Pod, bytemuck::Zeroable)]
struct Vertex {
    position: [f32; 3],
    tex_coords: [f32; 2], // 새로운 필드!
}
그리고 VertexBufferLayout에 이 변경 사항을 반영합니다:
impl Vertex {
    fn desc<'a>() -> wgpu::VertexBufferLayout<'a> {
        use std::mem;
        wgpu::VertexBufferLayout {
            array_stride: mem::size_of::<Vertex>() as wgpu::BufferAddress,
            step_mode: wgpu::VertexStepMode::Vertex,
            attributes: &[
                wgpu::VertexAttribute {
                    offset: 0,
                    shader_location: 0,
                    format: wgpu::VertexFormat::Float32x3,
                },
                wgpu::VertexAttribute {
                    offset: mem::size_of::<[f32; 3]>() as wgpu::BufferAddress,
                    shader_location: 1,
                    format: wgpu::VertexFormat::Float32x2, // 새로운 형식!
                },
            ]
        }
    }
}
마지막으로, VERTICES 자체를 변경해야 합니다. 기존 정의를 다음으로 교체하세요:
// 변경됨
const VERTICES: &[Vertex] = &[
    Vertex { position: [-0.0868241, 0.49240386, 0.0], tex_coords: [0.4131759, 0.99240386], }, // A
    Vertex { position: [-0.49513406, 0.06958647, 0.0], tex_coords: [0.0048659444, 0.56958647], }, // B
    Vertex { position: [-0.21918549, -0.44939706, 0.0], tex_coords: [0.28081453, 0.05060294], }, // C
    Vertex { position: [0.35966998, -0.3473291, 0.0], tex_coords: [0.85967, 0.1526709], }, // D
    Vertex { position: [0.44147372, 0.2347359, 0.0], tex_coords: [0.9414737, 0.7347359], }, // E
];
# 셰이더 시간
새로운 Vertex 구조가 준비되었으니, 이제 셰이더를 업데이트할 시간입니다. 먼저 정점 셰이더에 tex_coords를 전달하고, 이를 프래그먼트 셰이더로 넘겨 Sampler에서 최종 색상을 얻어야 합니다. 정점 셰이더부터 시작하겠습니다:
// 정점 셰이더

struct VertexInput {
    @location(0) position: vec3<f32>,
    @location(1) tex_coords: vec2<f32>,
}

struct VertexOutput {
    @builtin(position) clip_position: vec4<f32>,
    @location(0) tex_coords: vec2<f32>,
}

@vertex
fn vs_main(
    model: VertexInput,
) -> VertexOutput {
    var out: VertexOutput;
    out.tex_coords = model.tex_coords;
    out.clip_position = vec4<f32>(model.position, 1.0);
    return out;
}
이제 정점 셰이더가 tex_coords를 출력하므로, 프래그먼트 셰이더가 이를 입력으로 받도록 변경해야 합니다. 이 좌표들을 가지고 드디어 샘플러를 사용하여 텍스처에서 색상을 얻을 수 있습니다.
// 프래그먼트 셰이더

@group(0) @binding(0)
var t_diffuse: texture_2d<f32>;
@group(0) @binding(1)
var s_diffuse: sampler;

@fragment
fn fs_main(in: VertexOutput) -> @location(0) vec4<f32> {
    return textureSample(t_diffuse, s_diffuse, in.tex_coords);
}
t_diffuse와 s_diffuse 변수는 유니폼(uniform)이라고 알려진 것입니다. 유니폼에 대해서는 카메라 섹션에서 더 자세히 다룰 것입니다. 지금은 group()이 set_bind_group()의 첫 번째 매개변수에 해당하고, binding()이 BindGroupLayout과 BindGroup을 만들 때 지정한 binding에 관련된다는 것만 알면 됩니다.
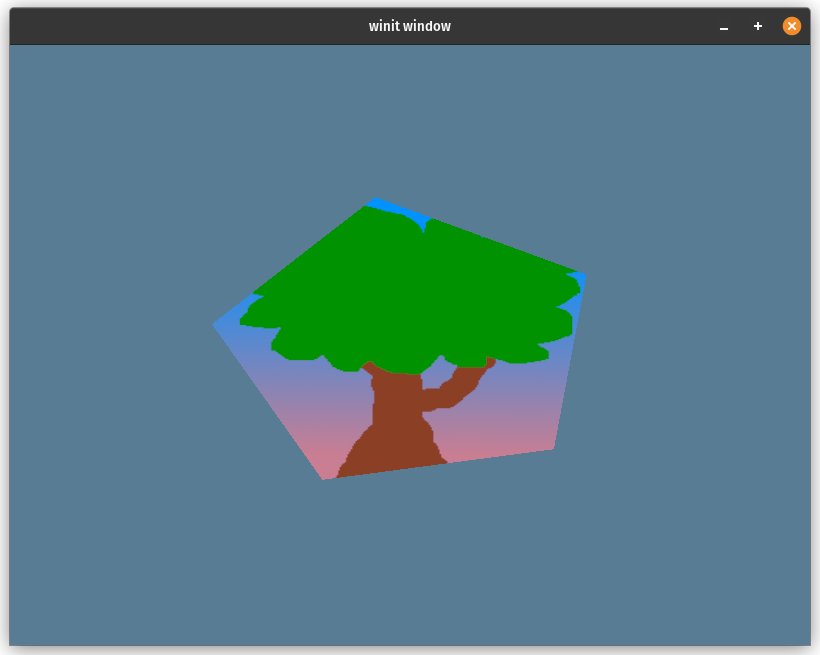
# 결과
이제 프로그램을 실행하면 다음과 같은 결과를 얻을 수 있습니다:
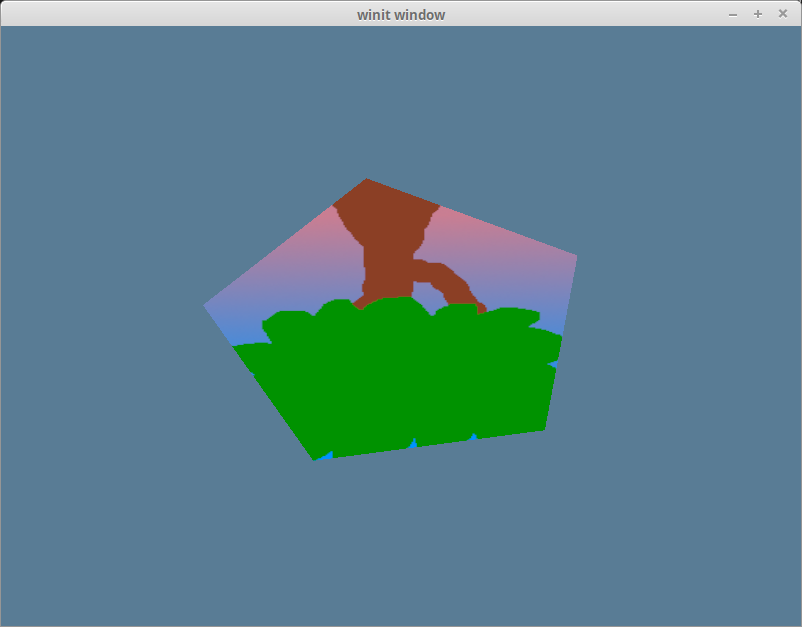
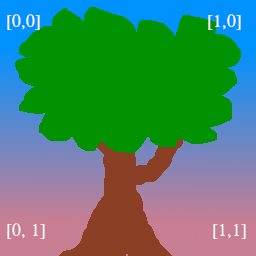
이상하네요. 나무가 거꾸로 뒤집혀 있습니다! 이는 wgpu의 월드 좌표계는 y축이 위를 향하는 반면, 텍스처 좌표계는 y축이 아래를 향하기 때문입니다. 다시 말해, 텍스처 좌표의 (0, 0)은 이미지의 왼쪽 상단에 해당하고 (1, 1)은 오른쪽 하단에 해당합니다.
각 텍스처 좌표의 y 좌표 y를 1 - y로 바꾸면 삼각형을 바로 세울 수 있습니다:
const VERTICES: &[Vertex] = &[
    // 변경됨
    Vertex { position: [-0.0868241, 0.49240386, 0.0], tex_coords: [0.4131759, 0.00759614], }, // A
    Vertex { position: [-0.49513406, 0.06958647, 0.0], tex_coords: [0.0048659444, 0.43041354], }, // B
    Vertex { position: [-0.21918549, -0.44939706, 0.0], tex_coords: [0.28081453, 0.949397], }, // C
    Vertex { position: [0.35966998, -0.3473291, 0.0], tex_coords: [0.85967, 0.84732914], }, // D
    Vertex { position: [0.44147372, 0.2347359, 0.0], tex_coords: [0.9414737, 0.2652641], }, // E
];
이 코드를 적용하면 이제 오각형 위에 나무가 바로 서 있는 것을 볼 수 있습니다:
# 코드 정리하기
편의를 위해, 텍스처 코드를 별도의 모듈로 분리합시다. 먼저 오류 처리를 단순화하기 위해 Cargo.toml 파일에 anyhow (opens new window) 크레이트를 추가해야 합니다.
[dependencies]
# ... (기존 의존성들)
anyhow = "1.0" # 새로운 의존성!
# bytemuck은 derive 기능이 필요합니다.
bytemuck = { version = "1.12", features = [ "derive" ] }
그런 다음 src/texture.rs라는 새 파일에 다음 코드를 추가하세요:
use image::GenericImageView;
use anyhow::Result;

pub struct Texture {
    #[allow(unused)]
    pub texture: wgpu::Texture,
    pub view: wgpu::TextureView,
    pub sampler: wgpu::Sampler,
}

impl Texture {
    pub fn from_bytes(
        device: &wgpu::Device,
        queue: &wgpu::Queue,
        bytes: &[u8],
        label: &str
    ) -> Result<Self> {
        let img = image::load_from_memory(bytes)?;
        Self::from_image(device, queue, &img, Some(label))
    }

    pub fn from_image(
        device: &wgpu::Device,
        queue: &wgpu::Queue,
        img: &image::DynamicImage,
        label: Option<&str>
    ) -> Result<Self> {
        let rgba = img.to_rgba8();
        let dimensions = img.dimensions();

        let size = wgpu::Extent3d {
            width: dimensions.0,
            height: dimensions.1,
            depth_or_array_layers: 1,
        };
        let texture = device.create_texture(
            &wgpu::TextureDescriptor {
                label,
                size,
                mip_level_count: 1,
                sample_count: 1,
                dimension: wgpu::TextureDimension::D2,
                format: wgpu::TextureFormat::Rgba8UnormSrgb,
                usage: wgpu::TextureUsages::TEXTURE_BINDING | wgpu::TextureUsages::COPY_DST,
                view_formats: &[],
            }
        );

        queue.write_texture(
            wgpu::TexelCopyTextureInfo {
                texture: &texture,
                mip_level: 0,
                origin: wgpu::Origin3d::ZERO,
                aspect: wgpu::TextureAspect::All,
            },
            &rgba,
            wgpu::TexelCopyBufferLayout {
                offset: 0,
                bytes_per_row: Some(4 * dimensions.0),
                rows_per_image: Some(dimensions.1),
            },
            size,
        );

        let view = texture.create_view(&wgpu::TextureViewDescriptor::default());
        let sampler = device.create_sampler(
            &wgpu::SamplerDescriptor {
                address_mode_u: wgpu::AddressMode::ClampToEdge,
                address_mode_v: wgpu::AddressMode::ClampToEdge,
                address_mode_w: wgpu::AddressMode::ClampToEdge,
                mag_filter: wgpu::FilterMode::Linear,
                min_filter: wgpu::FilterMode::Nearest,
                mipmap_filter: wgpu::FilterMode::Nearest,
                ..Default::default()
            }
        );

        Ok(Self { texture, view, sampler })
    }
}
as_rgba8() 대신 to_rgba8()을 사용하고 있음을 주목하세요. PNG는 알파 채널이 있으므로 as_rgba8()으로도 잘 작동합니다. 하지만 JPEG는 알파 채널이 없어서 우리가 사용할 JPEG 텍스처 이미지에 as_rgba8()을 호출하면 코드가 패닉을 일으킬 것입니다. 대신 to_rgba8()을 사용하면 원본 이미지에 알파 채널이 없더라도 알파 채널이 있는 새 이미지 버퍼를 생성하여 이러한 이미지를 처리할 수 있습니다.
texture.rs를 모듈로 가져와야 하므로, lib.rs 상단에 다음을 추가하세요.
mod texture;
이제 new()의 텍스처 생성 코드가 훨씬 간단해집니다:
let config = wgpu::SurfaceConfiguration {
    usage: wgpu::TextureUsages::RENDER_ATTACHMENT,
    format: surface_format,
    width: size.width,
    height: size.height,
    present_mode: surface_caps.present_modes[0],
    alpha_mode: surface_caps.alpha_modes[0],
    view_formats: vec![],
    desired_maximum_frame_latency: 2,
};

let diffuse_bytes = include_bytes!("happy-tree.png"); // 변경됨!
let diffuse_texture = texture::Texture::from_bytes(&device, &queue, diffuse_bytes, "happy-tree.png").unwrap(); // 변경됨!

// `let texture_bind_group_layout = ...`까지의 모든 코드를 이제 제거할 수 있습니다.
Texture가 BindGroup의 레이아웃을 알 필요가 없도록 바인드 그룹은 여전히 별도로 저장해야 합니다. diffuse_bind_group의 생성은 diffuse_texture의 view와 sampler 필드를 사용하도록 약간 변경됩니다:
let diffuse_bind_group = device.create_bind_group(
    &wgpu::BindGroupDescriptor {
        layout: &texture_bind_group_layout,
        entries: &[
            wgpu::BindGroupEntry {
                binding: 0,
                resource: wgpu::BindingResource::TextureView(&diffuse_texture.view), // 변경됨!
            },
            wgpu::BindGroupEntry {
                binding: 1,
                resource: wgpu::BindingResource::Sampler(&diffuse_texture.sampler), // 변경됨!
            }
        ],
        label: Some("diffuse_bind_group"),
    }
);
마지막으로, 향후 튜토리얼에서 필요할 것이므로 State 필드를 업데이트하여 우리의 새로운 Texture 구조체를 사용하도록 합시다.
pub struct State {
    // ...
    diffuse_bind_group: wgpu::BindGroup,
    diffuse_texture: texture::Texture, // 새로운 필드
}
impl State {
    async fn new() -> Self {
        // ...
        Self {
            // ...
            num_indices,
            diffuse_bind_group,
            diffuse_texture, // 새로운 필드
        }
    }
}
휴!
이 변경 사항들이 적용되면 코드는 이전과 동일하게 작동하지만, 이제 텍스처를 훨씬 쉽게 만들 수 있는 방법을 갖게 되었습니다.
# 데모
# 도전 과제
다른 텍스처를 하나 더 만들고, 스페이스 키를 누르면 텍스처를 교체하도록 만들어 보세요.