# 깊이 버퍼 (The Depth Buffer)
지난 예제를 다른 각도에서 자세히 살펴보겠습니다.
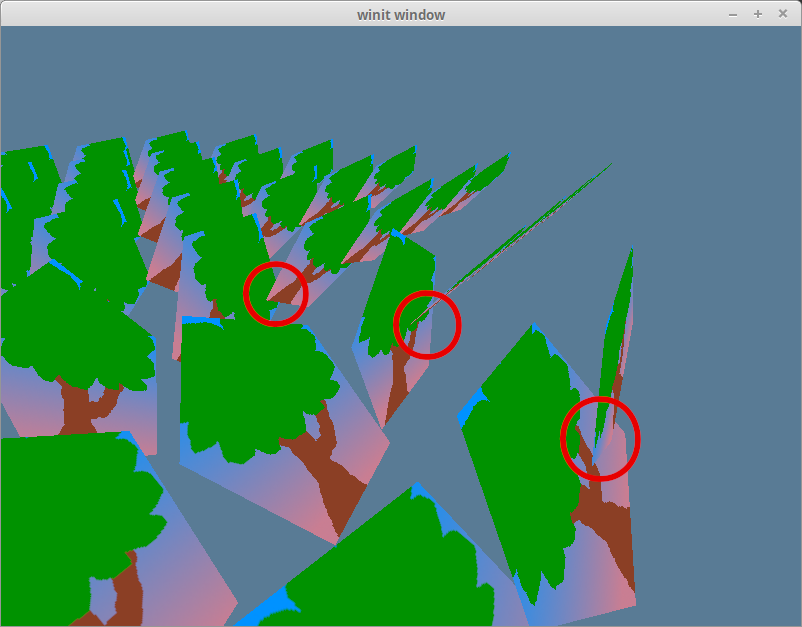
뒤에 있어야 할 모델이 앞에 있는 모델보다 먼저 렌더링되고 있습니다. 이는 그리기 순서(draw order) 때문에 발생합니다. 기본적으로, 새로운 객체의 픽셀 데이터는 이전 픽셀 데이터를 덮어씁니다.
이 문제를 해결하는 방법에는 두 가지가 있습니다: 데이터를 뒤에서 앞으로 정렬하거나, 깊이 버퍼(depth buffer)라고 알려진 것을 사용하는 것입니다.
# 뒤에서 앞으로 정렬하기
2D 렌더링에서는 무엇이 앞에 와야 하는지 알기 쉽기 때문에 이 방법이 주로 사용됩니다. 그냥 z-순서(z-order)를 사용하면 됩니다. 3D 렌더링에서는 카메라 각도에 따라 객체의 순서가 바뀌기 때문에 좀 더 까다로워집니다.
이를 간단하게 처리하는 방법은 모든 객체를 카메라 위치로부터의 거리에 따라 정렬하는 것입니다. 하지만 이 방법에는 결함이 있습니다. 예를 들어 큰 객체가 작은 객체 뒤에 있을 때, 작은 객체보다 앞에 있어야 할 큰 객체의 일부가 뒤에 렌더링될 수 있습니다. 또한 자기 자신과 겹치는 객체에서도 문제가 발생합니다.
이를 제대로 처리하려면 픽셀 수준의 정밀도가 필요합니다. 바로 이 지점에서 깊이 버퍼가 등장합니다.
# 픽셀의 깊이
깊이 버퍼는 렌더링된 픽셀의 z-좌표를 저장하는 흑백 텍스처입니다. wgpu는 새로운 픽셀을 그릴 때 이 정보를 사용하여 기존 데이터를 덮어쓸지 유지할지 결정할 수 있습니다. 이 기술을 깊이 테스트(depth testing)라고 합니다. 이 방법을 사용하면 객체를 정렬할 필요 없이 그리기 순서 문제를 해결할 수 있습니다!
texture.rs에 깊이 텍스처를 생성하는 함수를 만들어 봅시다.
impl Texture {
    pub const DEPTH_FORMAT: wgpu::TextureFormat = wgpu::TextureFormat::Depth32Float; // 1.

    pub fn create_depth_texture(device: &wgpu::Device, config: &wgpu::SurfaceConfiguration, label: &str) -> Self {
        let size = wgpu::Extent3d { // 2.
            width: config.width.max(1),
            height: config.height.max(1),
            depth_or_array_layers: 1,
        };
        let desc = wgpu::TextureDescriptor {
            label: Some(label),
            is_surface_configured: false,
            mip_level_count: 1,
            sample_count: 1,
            dimension: wgpu::TextureDimension::D2,
            format: Self::DEPTH_FORMAT,
            usage: wgpu::TextureUsages::RENDER_ATTACHMENT // 3.
                | wgpu::TextureUsages::TEXTURE_BINDING,
            view_formats: &[],
        };
        let texture = device.create_texture(&desc);

        let view = texture.create_view(&wgpu::TextureViewDescriptor::default());
        let sampler = device.create_sampler(
            &wgpu::SamplerDescriptor { // 4.
                address_mode_u: wgpu::AddressMode::ClampToEdge,
                address_mode_v: wgpu::AddressMode::ClampToEdge,
                address_mode_w: wgpu::AddressMode::ClampToEdge,
                mag_filter: wgpu::FilterMode::Linear,
                min_filter: wgpu::FilterMode::Linear,
                mipmap_filter: wgpu::FilterMode::Nearest,
                compare: Some(wgpu::CompareFunction::LessEqual), // 5.
                lod_min_clamp: 0.0,
                lod_max_clamp: 100.0,
                ..Default::default()
            }
        );

        Self { texture, view, sampler }
    }
}
render_pipeline의 깊이 단계(depth stage)를 만들고 깊이 텍스처 자체를 생성하기 위해DEPTH_FORMAT이 필요합니다.- 렌더링이 올바르게 되려면 깊이 텍스처가 화면과 동일한 크기여야 합니다.
config를 사용하여 깊이 텍스처가 서피스 텍스처와 같은 크기가 되도록 할 수 있습니다. - 이 텍스처에 렌더링할 것이므로,
RENDER_ATTACHMENT플래그를 추가해야 합니다. - 기술적으로 깊이 텍스처에 샘플러(sampler)가 반드시 필요한 것은 아니지만, 우리의
Texture구조체는 이를 요구하며, 만약 텍스처를 샘플링하고 싶다면 샘플러가 필요합니다. - 만약 깊이 텍스처를 렌더링하기로 결정한다면
CompareFunction::LessEqual를 사용해야 합니다. 이는sampler_comparison과textureSampleCompare()가 GLSL의texture()함수와 상호 작용하는 방식 때문입니다.
State::new()에서 depth_texture를 생성합니다.
let depth_texture = texture::Texture::create_depth_texture(&device, &config, "depth_texture");
깊이 테스트를 허용하도록 render_pipeline을 수정해야 합니다.
let render_pipeline = device.create_render_pipeline(&wgpu::RenderPipelineDescriptor {
    // ...
    depth_stencil: Some(wgpu::DepthStencilState {
        format: texture::Texture::DEPTH_FORMAT,
        depth_write_enabled: true,
        depth_compare: wgpu::CompareFunction::Less, // 1.
        stencil: wgpu::StencilState::default(), // 2.
        bias: wgpu::DepthBiasState::default(),
    }),
    // ...
});
depth_compare함수는 언제 새로운 픽셀을 버릴지 결정합니다.Less를 사용하면 픽셀이 앞에서 뒤 순서로 그려진다는 의미입니다. 사용할 수 있는 다른 CompareFunction (opens new window) 값들은 다음과 같습니다.#[repr(C)] #[derive(Copy, Clone, Debug, Hash, Eq, PartialEq)] #[cfg_attr(feature = "serde", derive(Serialize, Deserialize))] pub enum CompareFunction { Undefined = 0, Never = 1, Less = 2, Equal = 3, LessEqual = 4, Greater = 5, NotEqual = 6, GreaterEqual = 7, Always = 8, }스텐실 버퍼(stencil buffer)라고 불리는 또 다른 유형의 버퍼가 있습니다. 일반적으로 스텐실 버퍼와 깊이 버퍼는 동일한 텍스처에 함께 저장됩니다. 이 필드들은 스텐실 테스트(stencil testing)를 위한 값을 제어합니다. 우리는 스텐실 버퍼를 사용하지 않으므로 기본값을 사용합니다. 스텐실 버퍼에 대해서는 나중에 다루겠습니다.
depth_texture를 State에 저장하는 것을 잊지 마세요.
pub struct State {
    // ...
    depth_texture: Texture,
    // ...
}

async fn new(window: Window) -> Self {
    // ...

    Self {
        // ...
        depth_texture,
        // ...
    }
}
resize() 메서드를 변경하여 새로운 depth_texture를 생성해야 한다는 점을 기억해야 합니다.
fn resize(&mut self, width: u32, height: u32) {
    // ...

    self.depth_texture = texture::Texture::create_depth_texture(&self.device, &self.config, "depth_texture");

    // ...
}
config를 업데이트한 후에 depth_texture를 업데이트해야 합니다. 그렇지 않으면 depth_texture가 surface 텍스처와 크기가 달라져 프로그램이 충돌할 것입니다.
마지막으로 변경해야 할 부분은 render() 함수입니다. depth_texture를 생성했지만, 현재는 사용하고 있지 않습니다. 이를 렌더 패스(render pass)의 depth_stencil_attachment에 첨부하여 사용합니다.
let mut render_pass = encoder.begin_render_pass(&wgpu::RenderPassDescriptor {
    // ...
    depth_stencil_attachment: Some(wgpu::RenderPassDepthStencilAttachment {
        view: &self.depth_texture.view,
        depth_ops: Some(wgpu::Operations {
            load: wgpu::LoadOp::Clear(1.0),
            store: wgpu::StoreOp::Store,
        }),
        stencil_ops: None,
    }),
});
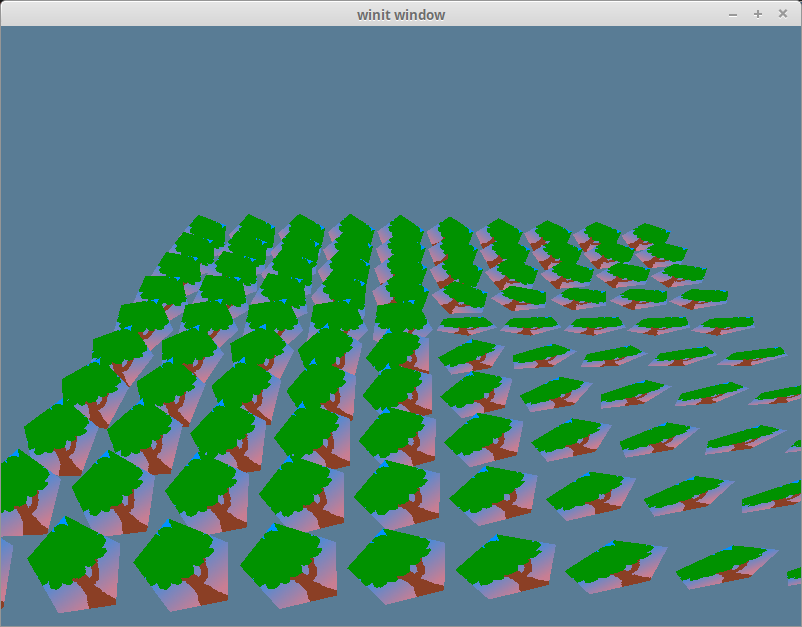
이것이 우리가 해야 할 전부입니다! 셰이더 코드는 필요하지 않습니다! 애플리케이션을 실행하면 깊이 문제가 해결될 것입니다.
# 데모
# 도전 과제
깊이 버퍼는 텍스처이므로 셰이더에서 샘플링할 수 있습니다. 이것은 깊이 텍스처이기 때문에, 각각 sampler와 sampler2D 대신 sampler_comparison 유니폼 타입과 textureSampleCompare 함수를 사용해야 합니다. 깊이 텍스처를 위한 바인드 그룹을 생성(또는 기존 그룹을 재사용)하고, 이를 화면에 렌더링해 보세요.