# 노멀 매핑 (Normal Mapping)
조명만으로도 우리 씬은 이미 꽤 멋져 보입니다. 하지만 모델이 여전히 너무 매끄럽습니다. 이는 우리가 매우 단순한 모델을 사용하고 있기 때문에 당연한 결과입니다. 만약 매끄러워야 할 텍스처를 사용했다면 문제가 되지 않았겠지만, 우리 벽돌 텍스처는 더 거칠어야 합니다. 더 많은 지오메트리(geometry)를 추가하여 이 문제를 해결할 수도 있지만, 이는 씬의 속도를 저하시킬 것이고, 어디에 새로운 폴리곤을 추가해야 할지 알기 어렵습니다. 바로 이 지점에서 노멀 매핑이 등장합니다.
인스턴싱 튜토리얼에서 텍스처에 인스턴스 데이터를 저장하는 실험을 했던 것을 기억하시나요? 노멀 맵은 바로 노멀 데이터를 가지고 그 작업을 하는 것입니다! 우리는 정점 노멀에 더해 노멀 맵에 있는 노멀을 조명 계산에 사용할 것입니다.
제가 찾은 벽돌 텍스처에는 노멀 맵이 함께 제공되었습니다. 한번 살펴봅시다!
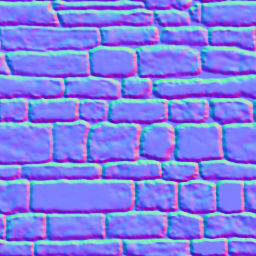
텍스처의 r, g, b 요소는 각각 노멀의 x, y, z 요소에 해당합니다. 모든 z 값은 양수여야 합니다. 이것이 노멀 맵이 푸른빛을 띠는 이유입니다.
model.rs 파일의 Material 구조체를 수정하여 normal_texture를 포함해야 합니다.
pub struct Material {
    pub name: String,
    pub diffuse_texture: texture::Texture,
    pub normal_texture: texture::Texture, // 변경!
    pub bind_group: wgpu::BindGroup,
}
노멀 맵도 포함하도록 texture_bind_group_layout을 업데이트해야 합니다.
let texture_bind_group_layout = device.create_bind_group_layout(&wgpu::BindGroupLayoutDescriptor {
    entries: &[
        // ...
        // 노멀 맵
        wgpu::BindGroupLayoutEntry {
            binding: 2,
            visibility: wgpu::ShaderStages::FRAGMENT,
            ty: wgpu::BindingType::Texture {
                multisampled: false,
                sample_type: wgpu::TextureSampleType::Float { filterable: true },
                view_dimension: wgpu::TextureViewDimension::D2,
            },
            count: None,
        },
        wgpu::BindGroupLayoutEntry {
            binding: 3,
            visibility: wgpu::ShaderStages::FRAGMENT,
            ty: wgpu::BindingType::Sampler(wgpu::SamplerBindingType::Filtering),
            count: None,
        },
    ],
    label: Some("texture_bind_group_layout"),
});
노멀 맵을 로드해야 합니다. resources.rs의 load_model() 함수에서 재질(material)을 생성하는 루프 안에서 이 작업을 수행할 것입니다.
// resources.rs
let mut materials = Vec::new();
for m in obj_materials? {
    let diffuse_texture = load_texture(&m.diffuse_texture, device, queue).await?;
    // 추가!
    let normal_texture = load_texture(&m.normal_texture, device, queue).await?;

    materials.push(model::Material::new(
        device,
        &m.name,
        diffuse_texture,
        normal_texture, // 추가!
        layout,
    ));
}
이전에 없었던 Material::new() 함수를 사용하고 있는 것을 보실 수 있습니다. 해당 코드는 다음과 같습니다:
impl Material {
    pub fn new(
        device: &wgpu::Device,
        name: &str,
        diffuse_texture: texture::Texture,
        normal_texture: texture::Texture, // 추가!
        layout: &wgpu::BindGroupLayout,
    ) -> Self {
        let bind_group = device.create_bind_group(&wgpu::BindGroupDescriptor {
            layout,
            entries: &[
                wgpu::BindGroupEntry {
                    binding: 0,
                    resource: wgpu::BindingResource::TextureView(&diffuse_texture.view),
                },
                wgpu::BindGroupEntry {
                    binding: 1,
                    resource: wgpu::BindingResource::Sampler(&diffuse_texture.sampler),
                },
                // 추가!
                wgpu::BindGroupEntry {
                    binding: 2,
                    resource: wgpu::BindingResource::TextureView(&normal_texture.view),
                },
                wgpu::BindGroupEntry {
                    binding: 3,
                    resource: wgpu::BindingResource::Sampler(&normal_texture.sampler),
                },
            ],
            label: Some(name),
        });

        Self {
            name: String::from(name),
            diffuse_texture,
            normal_texture, // 추가!
            bind_group,
        }
    }
}
이제 프래그먼트 셰이더에서 텍스처를 사용할 수 있습니다.
// 프래그먼트 셰이더

@group(0) @binding(0)
var t_diffuse: texture_2d<f32>;
@group(0)@binding(1)
var s_diffuse: sampler;
@group(0)@binding(2)
var t_normal: texture_2d<f32>;
@group(0) @binding(3)
var s_normal: sampler;

@fragment
fn fs_main(in: VertexOutput) -> @location(0) vec4<f32> {
    let object_color: vec4<f32> = textureSample(t_diffuse, s_diffuse, in.tex_coords);
    let object_normal: vec4<f32> = textureSample(t_normal, s_normal, in.tex_coords);

    // 앰비언트 라이트는 많이 필요하지 않으므로 0.1이면 충분합니다.
    let ambient_strength = 0.1;
    let ambient_color = light.color * ambient_strength;

    // 조명 벡터 생성
    let tangent_normal = object_normal.xyz * 2.0 - 1.0;
    let light_dir = normalize(light.position - in.world_position);
    let view_dir = normalize(camera.view_pos.xyz - in.world_position);
    let half_dir = normalize(view_dir + light_dir);

    let diffuse_strength = max(dot(tangent_normal, light_dir), 0.0);
    let diffuse_color = light.color * diffuse_strength;

    let specular_strength = pow(max(dot(tangent_normal, half_dir), 0.0), 32.0);
    let specular_color = specular_strength * light.color;

    let result = (ambient_color + diffuse_color + specular_color) * object_color.xyz;

    return vec4<f32>(result, object_color.a);
}
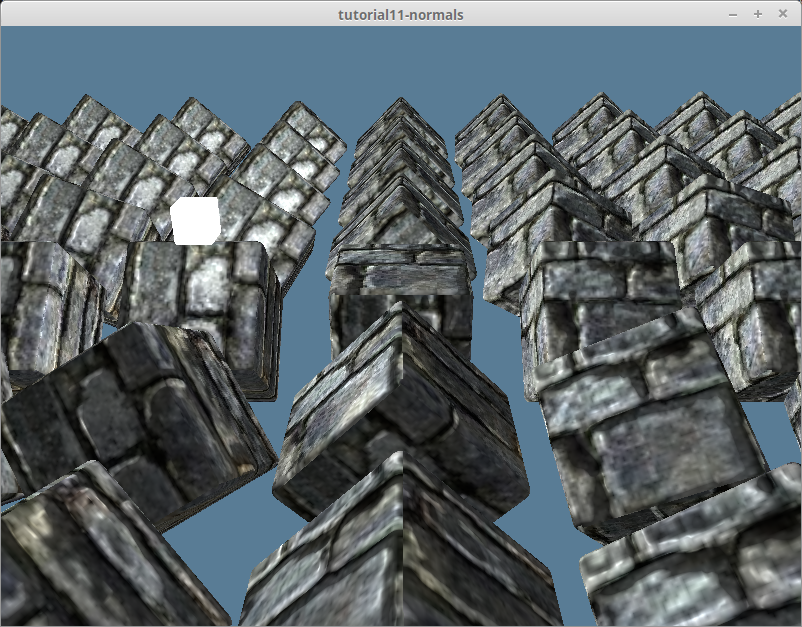
이제 코드를 실행하면, 무언가 제대로 보이지 않는 것을 알 수 있습니다. 이전 튜토리얼의 결과와 비교해 봅시다.
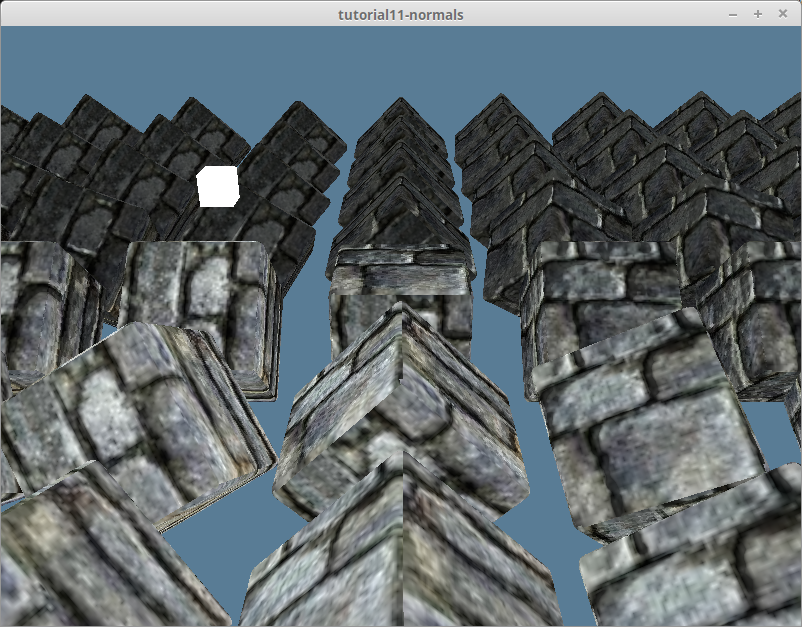
밝아야 할 씬의 일부가 어두워지고, 그 반대의 경우도 발생합니다.
# 탄젠트 공간에서 월드 공간으로
조명 튜토리얼에서 '월드 공간(world space)'에서 조명 계산을 수행하고 있다고 간단히 언급했습니다. 이는 전체 씬이 월드 좌표계를 기준으로 방향이 정해져 있다는 의미였습니다. 노멀 텍스처에서 노멀 데이터를 가져올 때, 모든 노멀은 대략 양의 z 방향을 가리키는, 이른바 탄젠트 공간(tangent space)에 있습니다. 이는 우리의 조명 계산이 모델의 모든 표면이 대략 같은 방향을 향하고 있다고 생각하게 만듭니다.
조명 튜토리얼을 다시 떠올려보면, 우리는 표면의 방향을 나타내기 위해 정점 노멀을 사용했습니다. 알고 보니, 탄젠트 공간의 노멀을 월드 공간으로 변환하기 위해 그것을 사용할 수 있다는 것입니다. 그러기 위해서는 선형대수학의 깊은 곳을 참고해야 합니다.
우리는 서로 수직인 (또는 정규 직교하는) 세 개의 벡터를 사용하여 좌표계를 나타내는 행렬을 만들 수 있습니다. 기본적으로, 좌표계의 x, y, z 축을 정의하는 것입니다.
let coordinate_system = mat3x3<f32>(
    vec3(1, 0, 0), // x축 (오른쪽)
    vec3(0, 1, 0), // y축 (위)
    vec3(0, 0, 1)  // z축 (앞)
);
우리는 정점 노멀을 기준으로 하는 좌표 공간을 나타내는 행렬을 만들 것입니다. 그리고 그 행렬을 사용하여 노멀 맵 데이터를 월드 공간으로 변환할 것입니다.
# 탄젠트(tangent)와 바이탄젠트(bitangent)
필요한 세 벡터 중 하나인 노멀은 이미 있습니다. 나머지 둘은 무엇일까요? 바로 탄젠트와 바이탄젠트 벡터입니다. 탄젠트는 표면과 평행한(즉, 교차하지 않는) 모든 벡터를 나타냅니다. 탄젠트는 항상 노멀 벡터와 수직입니다. 바이탄젠트는 다른 탄젠트 벡터와 수직인 탄젠트 벡터입니다. 탄젠트, 바이탄젠트, 노멀은 함께 각각 x, y, z 축을 나타냅니다.
일부 모델 형식은 탄젠트와 바이탄젠트(때로는 바이노멀(binormal)이라고도 함)를 정점 데이터에 포함하지만, OBJ는 그렇지 않습니다. 우리가 직접 계산해야 합니다. 다행히 기존 정점 데이터로부터 탄젠트와 바이탄젠트를 유도할 수 있습니다. 다음 다이어그램을 살펴보세요.

기본적으로, 삼각형의 변과 노멀을 사용하여 탄젠트와 바이탄젠트를 계산할 수 있습니다. 하지만 먼저 model.rs의 ModelVertex 구조체를 업데이트해야 합니다.
#[repr(C)]
#[derive(Copy, Clone, Debug, bytemuck::Pod, bytemuck::Zeroable)]
pub struct ModelVertex {
    pub position: [f32; 3],
    pub tex_coords: [f32; 2],
    pub normal: [f32; 3],
    // 추가!
    pub tangent: [f32; 3],
    pub bitangent: [f32; 3],
}
VertexBufferLayout도 업그레이드해야 합니다.
impl Vertex for ModelVertex {
    fn desc() -> wgpu::VertexBufferLayout<'static> {
        use std::mem;
        wgpu::VertexBufferLayout {
            array_stride: mem::size_of::<ModelVertex>() as wgpu::BufferAddress,
            step_mode: wgpu::VertexStepMode::Vertex,
            attributes: &[
                // ...

                // 탄젠트와 바이탄젠트
                wgpu::VertexAttribute {
                    offset: mem::size_of::<[f32; 8]>() as wgpu::BufferAddress,
                    shader_location: 3,
                    format: wgpu::VertexFormat::Float32x3,
                },
                wgpu::VertexAttribute {
                    offset: mem::size_of::<[f32; 11]>() as wgpu::BufferAddress,
                    shader_location: 4,
                    format: wgpu::VertexFormat::Float32x3,
                },
            ],
        }
    }
}
이제 새로운 탄젠트와 바이탄젠트 벡터를 계산할 수 있습니다. resource.rs의 load_model()에 있는 메쉬 생성 부분을 다음 코드를 사용하도록 업데이트하세요.
let meshes = models
    .into_iter()
    .map(|m| {
        let mut vertices = (0..m.mesh.positions.len() / 3)
            .map(|i| model::ModelVertex {
                position: [
                    m.mesh.positions[i * 3],
                    m.mesh.positions[i * 3 + 1],
                    m.mesh.positions[i * 3 + 2],
                ],
                tex_coords: [m.mesh.texcoords[i * 2], 1.0 - m.mesh.texcoords[i * 2 + 1]],
                normal: [
                    m.mesh.normals[i * 3],
                    m.mesh.normals[i * 3 + 1],
                    m.mesh.normals[i * 3 + 2],
                ],
                // 나중에 계산할 것입니다
                tangent: [0.0; 3],
                bitangent: [0.0; 3],
            })
            .collect::<Vec<_>>();

        let indices = &m.mesh.indices;
        let mut triangles_included = vec![0; vertices.len()];

        // 탄젠트와 바이탄젠트를 계산합니다. 삼각형을 사용할 것이므로
        // 인덱스를 3개씩 묶어서 순회해야 합니다.
        for c in indices.chunks(3) {
            let v0 = vertices[c[0] as usize];
            let v1 = vertices[c[1] as usize];
            let v2 = vertices[c[2] as usize];

            let pos0: cgmath::Vector3<_> = v0.position.into();
            let pos1: cgmath::Vector3<_> = v1.position.into();
            let pos2: cgmath::Vector3<_> = v2.position.into();

            let uv0: cgmath::Vector2<_> = v0.tex_coords.into();
            let uv1: cgmath::Vector2<_> = v1.tex_coords.into();
            let uv2: cgmath::Vector2<_> = v2.tex_coords.into();

            // 삼각형의 변 계산
            let delta_pos1 = pos1 - pos0;
            let delta_pos2 = pos2 - pos0;

            // 이것은 탄젠트와 바이탄젠트를 계산할 방향을 제공합니다.
            let delta_uv1 = uv1 - uv0;
            let delta_uv2 = uv2 - uv0;

            // 다음 연립 방정식을 풀면
            // 탄젠트와 바이탄젠트를 얻을 수 있습니다.
            //     delta_pos1 = delta_uv1.x * T + delta_u.y * B
            //     delta_pos2 = delta_uv2.x * T + delta_uv2.y * B
            // 다행히 이 방정식을 찾은 곳에서
            // 해법도 제공했습니다!
            let r = 1.0 / (delta_uv1.x * delta_uv2.y - delta_uv1.y * delta_uv2.x);
            let tangent = (delta_pos1 * delta_uv2.y - delta_pos2 * delta_uv1.y) * r;
            // wgpu 텍스처 좌표계에서 오른손 좌표계 노멀 맵을
            // 사용하기 위해 바이탄젠트를 뒤집습니다.
            let bitangent = (delta_pos2 * delta_uv1.x - delta_pos1 * delta_uv2.x) * -r;

            // 삼각형의 각 정점에 대해 동일한 탄젠트/바이탄젠트를 사용합니다.
            vertices[c[0] as usize].tangent =
                (tangent + cgmath::Vector3::from(vertices[c[0] as usize].tangent)).into();
            vertices[c[1] as usize].tangent =
                (tangent + cgmath::Vector3::from(vertices[c[1] as usize].tangent)).into();
            vertices[c[2] as usize].tangent =
                (tangent + cgmath::Vector3::from(vertices[c[2] as usize].tangent)).into();
            vertices[c[0] as usize].bitangent =
                (bitangent + cgmath::Vector3::from(vertices[c[0] as usize].bitangent)).into();
            vertices[c[1] as usize].bitangent =
                (bitangent + cgmath::Vector3::from(vertices[c[1] as usize].bitangent)).into();
            vertices[c[2] as usize].bitangent =
                (bitangent + cgmath::Vector3::from(vertices[c[2] as usize].bitangent)).into();

            // 탄젠트/바이탄젠트의 평균을 내는 데 사용됩니다.
            triangles_included[c[0] as usize] += 1;
            triangles_included[c[1] as usize] += 1;
            triangles_included[c[2] as usize] += 1;
        }

        // 탄젠트/바이탄젠트의 평균을 냅니다.
        for (i, n) in triangles_included.into_iter().enumerate() {
            let denom = 1.0 / n as f32;
            let mut v = &mut vertices[i];
            v.tangent = (cgmath::Vector3::from(v.tangent) * denom).into();
            v.bitangent = (cgmath::Vector3::from(v.bitangent) * denom).into();
        }

        let vertex_buffer = device.create_buffer_init(&wgpu::util::BufferInitDescriptor {
            label: Some(&format!("{:?} Vertex Buffer", file_name)),
            contents: bytemuck::cast_slice(&vertices),
            usage: wgpu::BufferUsages::VERTEX,
        });
        let index_buffer = device.create_buffer_init(&wgpu::util::BufferInitDescriptor {
            label: Some(&format!("{:?} Index Buffer", file_name)),
            contents: bytemuck::cast_slice(&m.mesh.indices),
            usage: wgpu::BufferUsages::INDEX,
        });

        model::Mesh {
            name: file_name.to_string(),
            vertex_buffer,
            index_buffer,
            num_elements: m.mesh.indices.len() as u32,
            material: m.mesh.material_id.unwrap_or(0),
        }
    })
    .collect::<Vec<_>>();
# 월드 공간에서 탄젠트 공간으로
노멀 맵은 기본적으로 탄젠트 공간에 있으므로, 계산에 사용되는 다른 모든 변수들도 탄젠트 공간으로 변환해야 합니다. 정점 셰이더에서 탄젠트 행렬을 구성해야 합니다. 먼저 VertexInput에 우리가 이전에 계산한 탄젠트와 바이탄젠트를 포함시켜야 합니다.
struct VertexInput {
    @location(0) position: vec3<f32>,
    @location(1) tex_coords: vec2<f32>,
    @location(2) normal: vec3<f32>,
    @location(3) tangent: vec3<f32>,
    @location(4) bitangent: vec3<f32>,
};
다음으로, tangent_matrix를 구성한 다음 정점의 조명 위치와 시점 위치를 탄젠트 공간으로 변환할 것입니다.
struct VertexOutput {
    @builtin(position) clip_position: vec4<f32>,
    @location(0) tex_coords: vec2<f32>,
    // 변경!
    @location(1) tangent_position: vec3<f32>,
    @location(2) tangent_light_position: vec3<f32>,
    @location(3) tangent_view_position: vec3<f32>,
};

@vertex
fn vs_main(
    model: VertexInput,
    instance: InstanceInput,
) -> VertexOutput {
    // ...
    let normal_matrix = mat3x3<f32>(
        instance.normal_matrix_0,
        instance.normal_matrix_1,
        instance.normal_matrix_2,
    );

    // 탄젠트 행렬 구성
    let world_normal = normalize(normal_matrix * model.normal);
    let world_tangent = normalize(normal_matrix * model.tangent);
    let world_bitangent = normalize(normal_matrix * model.bitangent);
    let tangent_matrix = transpose(mat3x3<f32>(
        world_tangent,
        world_bitangent,
        world_normal,
    ));

    let world_position = model_matrix * vec4<f32>(model.position, 1.0);

    var out: VertexOutput;
    out.clip_position = camera.view_proj * world_position;
    out.tex_coords = model.tex_coords;
    out.tangent_position = tangent_matrix * world_position.xyz;
    out.tangent_view_position = tangent_matrix * camera.view_pos.xyz;
    out.tangent_light_position = tangent_matrix * light.position;
    return out;
}
마지막으로, 프래그먼트 셰이더를 업데이트하여 이 변환된 조명 값들을 사용하도록 합니다.
@fragment
fn fs_main(in: VertexOutput) -> @location(0) vec4<f32> {
    // 텍스처 샘플링..

    // 조명 벡터 생성
    let tangent_normal = object_normal.xyz * 2.0 - 1.0;
    let light_dir = normalize(in.tangent_light_position - in.tangent_position);
    let view_dir = normalize(in.tangent_view_position - in.tangent_position);

    // 조명 계산 수행...
}
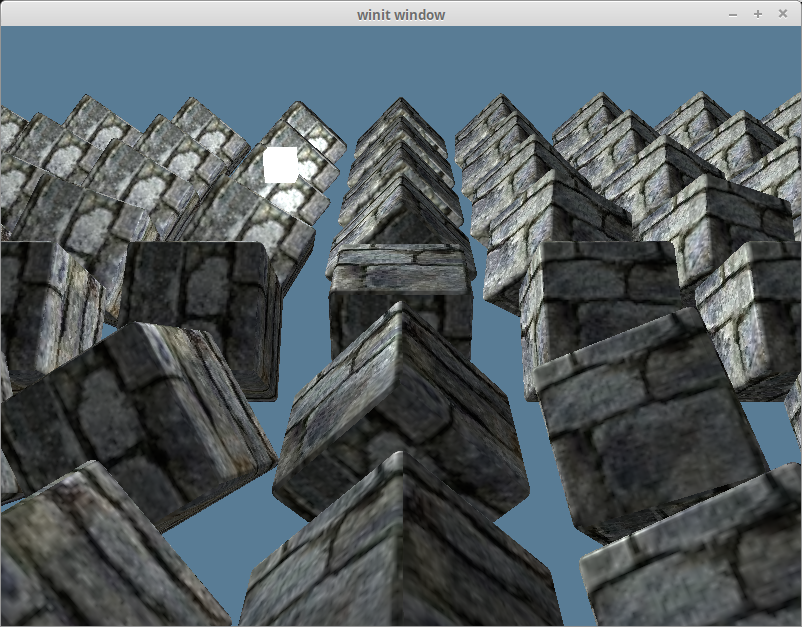
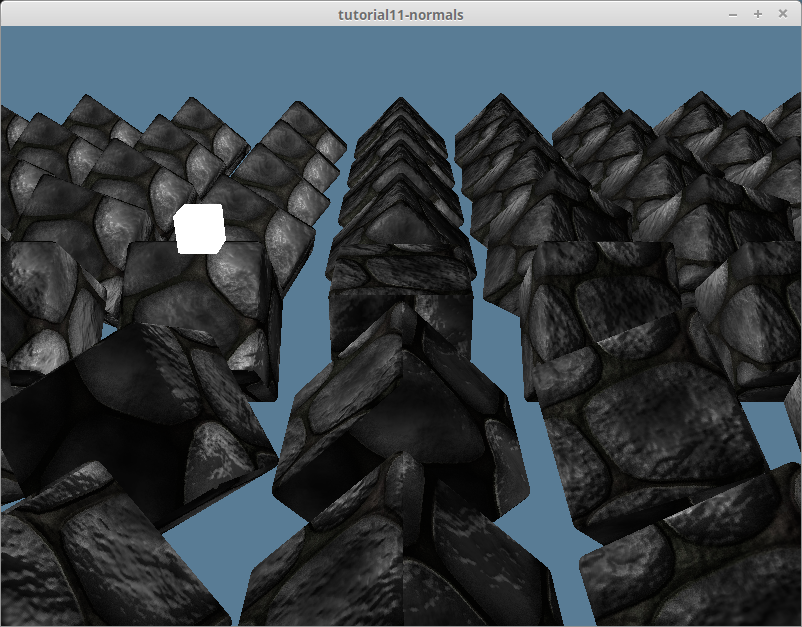
이 계산을 통해 다음과 같은 결과를 얻습니다.
# Srgb와 노멀 텍스처
우리는 모든 텍스처에 Rgba8UnormSrgb를 사용해왔습니다. Srgb는 비선형 색 공간입니다. 인간의 색상 인식 또한 선형적이지 않고, Srgb는 인간 색상 인식의 특이점에 맞춰 설계되었기 때문에 모니터에 이상적입니다.
하지만 Srgb는 수학적으로 연산되어야 하는 데이터에는 부적합한 색 공간입니다. 이러한 데이터는 선형(감마 보정되지 않은) 색 공간에 있어야 합니다. GPU가 이름에 Srgb가 포함된 텍스처를 샘플링할 때, 수학적 연산을 할 수 있도록 데이터를 비선형 감마 보정된 Srgb에서 선형 비감마 보정 색 공간으로 먼저 변환합니다 (그리고 Srgb 텍스처에 다시 쓸 때는 반대 변환을 수행합니다).
노멀 맵은 이미 선형 형식으로 저장되어 있습니다. 따라서 텍스처에 대해 선형 공간을 지정하여 읽을 때 부적절한 변환을 수행하지 않도록 해야 합니다.
텍스처를 생성할 때 Rgba8Unorm을 지정해야 합니다. Texture 구조체에 is_normal_map 메서드를 추가합시다.
pub fn from_image(
    device: &wgpu::Device,
    queue: &wgpu::Queue,
    img: &image::DynamicImage,
    label: Option<&str>,
    is_normal_map: bool, // 추가!
) -> Result<Self> {
    // ...
    // 추가!
    let format = if is_normal_map {
        wgpu::TextureFormat::Rgba8Unorm
    } else {
        wgpu::TextureFormat::Rgba8UnormSrgb
    };
    let texture = device.create_texture(&wgpu::TextureDescriptor {
        label,
        size: texture_size,
        mip_level_count: 1,
        sample_count: 1,
        dimension: wgpu::TextureDimension::D2,
        // 변경!
        format,
        usage: wgpu::TextureUsages::TEXTURE_BINDING | wgpu::TextureUsages::COPY_DST,
        view_formats: &[],
    });

    // ...

    Ok(Self {
        texture,
        view,
        sampler,
    })
}
이 변경 사항을 사용하는 다른 메서드에도 전파해야 합니다.
pub fn from_bytes(
    device: &wgpu::Device,
    queue: &wgpu::Queue,
    bytes: &[u8],
    label: &str,
    is_normal_map: bool, // 추가!
) -> Result<Self> {
    let img = image::load_from_memory(bytes)?;
    Self::from_image(device, queue, &img, Some(label), is_normal_map) // 변경!
}
resource.rs도 업데이트해야 합니다.
pub async fn load_texture(
    file_name: &str,
    is_normal_map: bool,
    device: &wgpu::Device,
    queue: &wgpu::Queue,
) -> anyhow::Result<texture::Texture> {
    let data = load_binary(file_name).await?;
    texture::Texture::from_bytes(device, queue, &data, file_name, is_normal_map)
}

pub async fn load_model(
    file_name: &str,
    device: &wgpu::Device,
    queue: &wgpu::Queue,
    layout: &wgpu::BindGroupLayout,
) -> anyhow::Result<model::Model> {
    // ...

    let mut materials = Vec::new();
    for m in obj_materials? {
        let diffuse_texture = load_texture(&m.diffuse_texture, false, device, queue).await?; // 변경!
        let normal_texture = load_texture(&m.normal_texture, true, device, queue).await?; // 변경!

        materials.push(model::Material::new(
            device,
            &m.name,
            diffuse_texture,
            normal_texture,
            layout,
        ));
    }
}
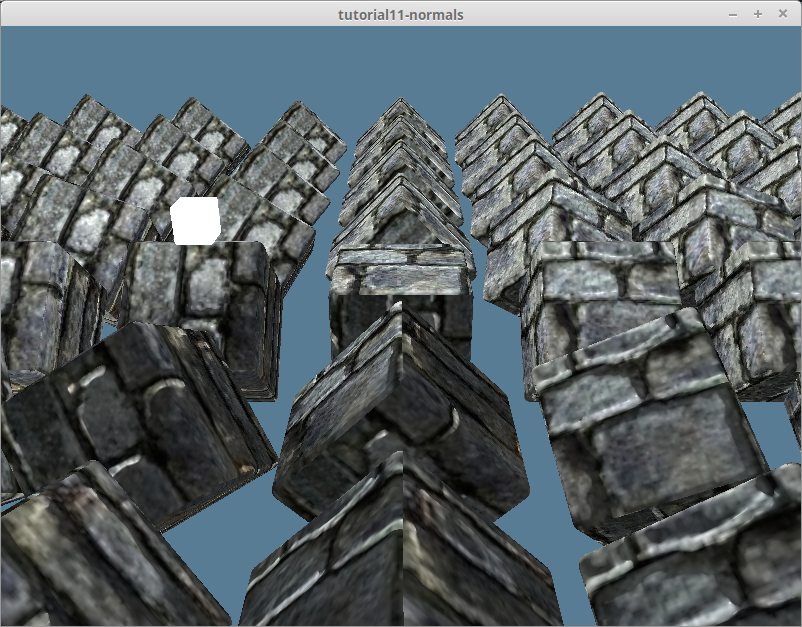
이렇게 하면 다음과 같은 결과가 나옵니다.
# 기타 내용
다른 재질로도 실험해보고 싶어서 DrawModel 트레이트에 draw_model_instanced_with_material()을 추가했습니다.
pub trait DrawModel<'a> {
    // ...
    fn draw_model_instanced_with_material(
        &mut self,
        model: &'a Model,
        material: &'a Material,
        instances: Range<u32>,
        camera_bind_group: &'a wgpu::BindGroup,
        light_bind_group: &'a wgpu::BindGroup,
    );
}

impl<'a, 'b> DrawModel<'b> for wgpu::RenderPass<'a>
where
    'b: 'a,
{
    // ...
    fn draw_model_instanced_with_material(
        &mut self,
        model: &'b Model,
        material: &'b Material,
        instances: Range<u32>,
        camera_bind_group: &'b wgpu::BindGroup,
        light_bind_group: &'b wgpu::BindGroup,
    ) {
        for mesh in &model.meshes {
            self.draw_mesh_instanced(mesh, material, instances.clone(), camera_bind_group, light_bind_group);
        }
    }
}
조약돌 텍스처와 그에 맞는 노멀 맵을 찾아서 debug_material을 만들었습니다.
// lib.rs
impl State {
    async fn new(window: &Window) -> Result<Self> {
        // ...
        let debug_material = {
            let diffuse_bytes = include_bytes!("../res/cobble-diffuse.png");
            let normal_bytes = include_bytes!("../res/cobble-normal.png");

            let diffuse_texture = texture::Texture::from_bytes(&device, &queue, diffuse_bytes, "res/alt-diffuse.png", false).unwrap();
            let normal_texture = texture::Texture::from_bytes(&device, &queue, normal_bytes, "res/alt-normal.png", true).unwrap();

            model::Material::new(&device, "alt-material", diffuse_texture, normal_texture, &texture_bind_group_layout)
        };
        Self {
            // ...
            #[allow(dead_code)]
            debug_material,
        }
    }
}
그런 다음, debug_material로 렌더링하기 위해 제가 만든 draw_model_instanced_with_material()를 사용했습니다.
render_pass.set_pipeline(&self.render_pipeline);
render_pass.draw_model_instanced_with_material(
    &self.obj_model,
    &self.debug_material,
    0..self.instances.len() as u32,
    &self.camera_bind_group,
    &self.light_bind_group,
);
그러면 다음과 같은 결과가 나옵니다.
제가 사용한 텍스처는 GitHub 저장소에서 찾을 수 있습니다.