# 하이 다이내믹 레인지 렌더링 (High Dynamic Range Rendering)
지금까지 우리는 sRGB 색상 공간을 사용하여 씬(scene)을 렌더링해 왔습니다. 이것도 괜찮지만, 조명을 다루는 데 한계가 있습니다. 우리는 (대부분의 시스템에서) 서피스 텍스처(surface texture)로 TextureFormat::Bgra8UnormSrgb를 사용하고 있습니다. 이는 빨강, 초록, 파랑, 알파 각 채널에 8비트를 사용한다는 의미입니다. 채널들은 0에서 255 사이의 정수로 저장되지만, 0.0과 1.0 사이의 부동 소수점 값으로 변환됩니다. 요약하자면, 8비트 텍스처를 사용하면 각 채널에서 256개의 가능한 값만 얻을 수 있다는 것입니다.
여기서 핵심은 이 정밀도의 대부분이 씬의 어두운 값을 표현하는 데 사용된다는 점입니다. 이는 전구와 같은 밝은 물체가 태양과 같은 극도로 밝은 물체와 동일한 값을 갖게 된다는 것을 의미합니다. 이러한 부정확성 때문에 사실적인 조명을 올바르게 구현하기가 어렵습니다. 이 때문에, 우리는 씬에 더 많은 유연성을 부여하고 물리 기반 렌더링(Physically Based Rendering)과 같은 고급 기술을 활용할 수 있도록 렌더링 시스템을 하이 다이내믹 레인지(HDR)를 사용하도록 전환할 것입니다.
# 하이 다이내믹 레인지란 무엇인가?
일반적으로 하이 다이내믹 레인지(HDR) 텍스처는 픽셀당 더 많은 비트를 가진 텍스처입니다. 또한, HDR 텍스처는 정수 값 대신 부동 소수점 값으로 저장됩니다. 이는 텍스처가 1.0보다 큰 밝기 값을 가질 수 있음을 의미하며, 따라서 더 밝은 객체들의 다이내믹 레인지를 가질 수 있습니다.
# HDR로 전환하기
이 글을 쓰는 시점에서 wgpu는 TextureFormat::Rgba16Float와 같은 부동 소수점 포맷을 서피스 텍스처 포맷으로 사용하는 것을 허용하지 않습니다 (모든 모니터가 이를 지원하는 것도 아닙니다). 따라서 우리는 씬을 HDR 포맷으로 렌더링한 다음, 톤 매핑(tonemapping)이라는 기술을 사용하여 그 값들을 TextureFormat::Bgra8UnormSrgb와 같은 지원되는 포맷으로 변환해야 합니다.
wgpu에서 HDR 서피스 텍스처 지원을 구현하는 것에 대한 몇 가지 논의가 있습니다. 이 노력에 기여하고 싶다면 다음 GitHub 이슈를 참고하세요: https://github.com/gfx-rs/wgpu/issues/2920
하지만 그 전에, 렌더링에 HDR 텍스처를 사용하도록 전환해야 합니다.
먼저, hdr.rs라는 파일을 만들고 다음 코드를 넣겠습니다:
use wgpu::Operations;

use crate::{create_render_pipeline, texture};

/// 렌더 텍스처를 소유하고 톤 매핑을 제어합니다.
pub struct HdrPipeline {
    pipeline: wgpu::RenderPipeline,
    bind_group: wgpu::BindGroup,
    texture: texture::Texture,
    width: u32,
    height: u32,
    format: wgpu::TextureFormat,
    layout: wgpu::BindGroupLayout,
}

impl HdrPipeline {
    pub fn new(device: &wgpu::Device, config: &wgpu::SurfaceConfiguration) -> Self {
        let width = config.width;
        let height = config.height;

        // `Rgba32Float`를 사용할 수도 있지만, 렌더링을 위해
        // 몇 가지 추가 기능을 활성화해야 합니다.
        let format = wgpu::TextureFormat::Rgba16Float;

        let texture = texture::Texture::create_2d_texture(
            device,
            width,
            height,
            format,
            wgpu::TextureUsages::TEXTURE_BINDING | wgpu::TextureUsages::RENDER_ATTACHMENT,
            wgpu::FilterMode::Nearest,
            Some("Hdr::texture"),
        );

        let layout = device.create_bind_group_layout(&wgpu::BindGroupLayoutDescriptor {
            label: Some("Hdr::layout"),
            entries: &[
                // 이것이 HDR 텍스처입니다.
                wgpu::BindGroupLayoutEntry {
                    binding: 0,
                    visibility: wgpu::ShaderStages::FRAGMENT,
                    ty: wgpu::BindingType::Texture {
                        sample_type: wgpu::TextureSampleType::Float { filterable: true },
                        view_dimension: wgpu::TextureViewDimension::D2,
                        multisampled: false,
                    },
                    count: None,
                },
                wgpu::BindGroupLayoutEntry {
                    binding: 1,
                    visibility: wgpu::ShaderStages::FRAGMENT,
                    ty: wgpu::BindingType::Sampler(wgpu::SamplerBindingType::Filtering),
                    count: None,
                },
            ],
        });
        let bind_group = device.create_bind_group(&wgpu::BindGroupDescriptor {
            label: Some("Hdr::bind_group"),
            layout: &layout,
            entries: &[
                wgpu::BindGroupEntry {
                    binding: 0,
                    resource: wgpu::BindingResource::TextureView(&texture.view),
                },
                wgpu::BindGroupEntry {
                    binding: 1,
                    resource: wgpu::BindingResource::Sampler(&texture.sampler),
                },
            ],
        });

        // 셰이더는 다음에 다룰 것입니다.
        let shader = wgpu::include_wgsl!("hdr.wgsl");
        let pipeline_layout = device.create_pipeline_layout(&wgpu::PipelineLayoutDescriptor {
            label: None,
            bind_group_layouts: &[&layout],
            push_constant_ranges: &[],
        });

        let pipeline = create_render_pipeline(
            device,
            &pipeline_layout,
            config.format.add_srgb_suffix(),
            None,
            // 셰이더에서 수학을 사용하여 정점 데이터를 생성할 것이므로,
            // 정점 버퍼는 필요 없습니다.
            &[],
            wgpu::PrimitiveTopology::TriangleList,
            shader,
        );

        Self {
            pipeline,
            bind_group,
            layout,
            texture,
            width,
            height,
            format,
        }
    }

    /// HDR 텍스처 크기 조정
    pub fn resize(&mut self, device: &wgpu::Device, width: u32, height: u32) {
        self.texture = texture::Texture::create_2d_texture(
            device,
            width,
            height,
            wgpu::TextureFormat::Rgba16Float,
            wgpu::TextureUsages::TEXTURE_BINDING | wgpu::TextureUsages::RENDER_ATTACHMENT,
            wgpu::FilterMode::Nearest,
            Some("Hdr::texture"),
        );
        self.bind_group = device.create_bind_group(&wgpu::BindGroupDescriptor {
            label: Some("Hdr::bind_group"),
            layout: &self.layout,
            entries: &[
                wgpu::BindGroupEntry {
                    binding: 0,
                    resource: wgpu::BindingResource::TextureView(&self.texture.view),
                },
                wgpu::BindGroupEntry {
                    binding: 1,
                    resource: wgpu::BindingResource::Sampler(&self.texture.sampler),
                },
            ],
        });
        self.width = width;
        self.height = height;
    }

    /// HDR 텍스처를 노출합니다.
    pub fn view(&self) -> &wgpu::TextureView {
        &self.texture.view
    }

    /// HDR 텍스처의 포맷
    pub fn format(&self) -> wgpu::TextureFormat {
        self.format
    }

    /// 이 메서드는 내부 HDR 텍스처를 매개변수로 제공된
    /// [TextureView]에 렌더링합니다.
    pub fn process(&self, encoder: &mut wgpu::CommandEncoder, output: &wgpu::TextureView) {
        let mut pass = encoder.begin_render_pass(&wgpu::RenderPassDescriptor {
            label: Some("Hdr::process"),
            color_attachments: &[Some(wgpu::RenderPassColorAttachment {
                view: &output,
                resolve_target: None,
                ops: Operations {
                    load: wgpu::LoadOp::Load,
                    store: wgpu::StoreOp::Store,
                },
            })],
            depth_stencil_attachment: None,
        });
        pass.set_pipeline(&self.pipeline);
        pass.set_bind_group(0, &self.bind_group, &[]);
        pass.draw(0..3, 0..1);
    }
}
create_render_pipeline에 새로운 매개변수를 추가한 것을 눈치채셨을 겁니다. 해당 함수의 변경 사항은 다음과 같습니다:
fn create_render_pipeline(
    device: &wgpu::Device,
    layout: &wgpu::PipelineLayout,
    color_format: wgpu::TextureFormat,
    depth_format: Option<wgpu::TextureFormat>,
    vertex_layouts: &[wgpu::VertexBufferLayout],
    topology: wgpu::PrimitiveTopology, // NEW!
    shader: wgpu::ShaderModuleDescriptor,
) -> wgpu::RenderPipeline {
    let shader = device.create_shader_module(shader);

    device.create_render_pipeline(&wgpu::RenderPipelineDescriptor {
        // ...
        primitive: wgpu::PrimitiveState {
            topology, // NEW!
            // ...
        },
        // ...
    })
}
# 톤 매핑(Tonemapping)
톤 매핑 과정은 HDR 이미지를 가져와 표준 다이내믹 레인지(SDR)로 변환하는 것이며, 보통 sRGB를 사용합니다. 사용하는 톤 매핑 곡선은 궁극적으로 예술적 필요에 따라 결정되지만, 이 튜토리얼에서는 게임 산업과 영화 산업 전반에 걸쳐 널리 사용되는 아카데미 컬러 인코딩 시스템(Academy Color Encoding System, ACES)이라는 인기 있는 방법을 사용하겠습니다.
이제 셰이더로 넘어가 봅시다. hdr.wgsl이라는 파일을 만들고 다음 코드를 추가하세요:
// HDR 값을 선형 값으로 매핑합니다.
// http://www.oscars.org/science-technology/sci-tech-projects/aces 기반
fn aces_tone_map(hdr: vec3<f32>) -> vec3<f32> {
    let m1 = mat3x3(
        0.59719, 0.07600, 0.02840,
        0.35458, 0.90834, 0.13383,
        0.04823, 0.01566, 0.83777,
    );
    let m2 = mat3x3(
        1.60475, -0.10208, -0.00327,
        -0.53108,  1.10813, -0.07276,
        -0.07367, -0.00605,  1.07602,
    );
    let v = m1 * hdr;
    let a = v * (v + 0.0245786) - 0.000090537;
    let b = v * (0.983729 * v + 0.4329510) + 0.238081;
    return clamp(m2 * (a / b), vec3(0.0), vec3(1.0));
}

struct VertexOutput {
    @location(0) uv: vec2<f32>,
    @builtin(position) clip_position: vec4<f32>,
};

@vertex
fn vs_main(
    @builtin(vertex_index) vi: u32,
) -> VertexOutput {
    var out: VertexOutput;
    // 화면 전체를 덮는 삼각형을 생성합니다.
    out.uv = vec2<f32>(
        f32((vi << 1u) & 2u),
        f32(vi & 2u),
    );
    out.clip_position = vec4<f32>(out.uv * 2.0 - 1.0, 0.0, 1.0);
    // 이미지가 뒤집히지 않도록 y 좌표를 반전시켜야 합니다.
    out.uv.y = 1.0 - out.uv.y;
    return out;
}

@group(0)
@binding(0)
var hdr_image: texture_2d<f32>;

@group(0)
@binding(1)
var hdr_sampler: sampler;

@fragment
fn fs_main(vs: VertexOutput) -> @location(0) vec4<f32> {
    let hdr = textureSample(hdr_image, hdr_sampler, vs.uv);
    let sdr = aces_tone_map(hdr.rgb);
    return vec4(sdr, hdr.a);
}
이제 이들을 배치했으니 핵심 렌더 파이프라인에서 HDR 텍스처를 사용해 봅시다. 먼저, State에 새로운 HdrPipeline을 추가해야 합니다:
// lib.rs

mod hdr; // NEW!

// ...

pub struct State {
    // ...
    // NEW!
    hdr: hdr::HdrPipeline,
}

impl State {
    pub fn new(window: Window) -> anyhow::Result<Self> {
        // ...
        // NEW!
        let hdr = hdr::HdrPipeline::new(&device, &config);

        // ...

        Self {
            // ...
            hdr, // NEW!
        }
    }
}
그런 다음, 창 크기를 조절할 때 HdrPipeline의 resize()를 호출해야 합니다:
fn resize(&mut self, width: u32, height: u32) {
    // UPDATED!
    if width > 0 && height > 0 {
        // ...
        self.hdr
            .resize(&self.device, new_size.width, new_size.height);
        // ...
    }
}
다음으로, render()에서 RenderPass가 서피스 텍스처 대신 HDR 텍스처를 사용하도록 전환해야 합니다:
// render()
let mut render_pass = encoder.begin_render_pass(&wgpu::RenderPassDescriptor {
    label: Some("Render Pass"),
    color_attachments: &[Some(wgpu::RenderPassColorAttachment {
        view: self.hdr.view(), // UPDATED!
        resolve_target: None,
        ops: wgpu::Operations {
            load: wgpu::LoadOp::Clear(wgpu::Color {
                r: 0.1,
                g: 0.2,
                b: 0.3,
                a: 1.0,
            }),
            store: wgpu::StoreOp::Store,
        },
    })],
    depth_stencil_attachment: Some(
        // ...
    ),
});
마지막으로, 프레임의 모든 객체를 그린 후, 서피스 텍스처를 출력으로 사용하여 톤매퍼를 실행할 수 있습니다:
// NEW!
// 톤 매핑 적용
self.hdr.process(&mut encoder, &view);
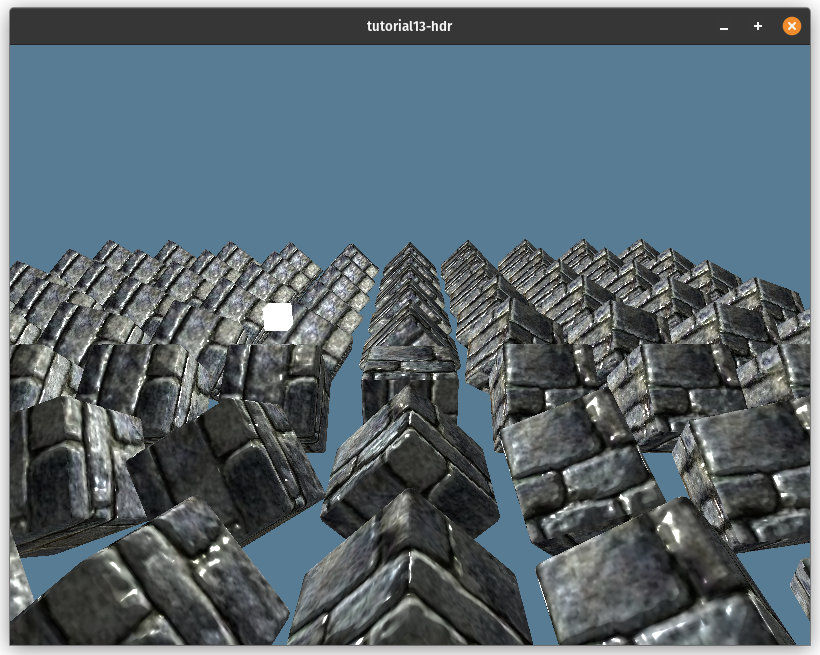
전환은 매우 쉽습니다. HDR을 사용하기 전의 이미지입니다:
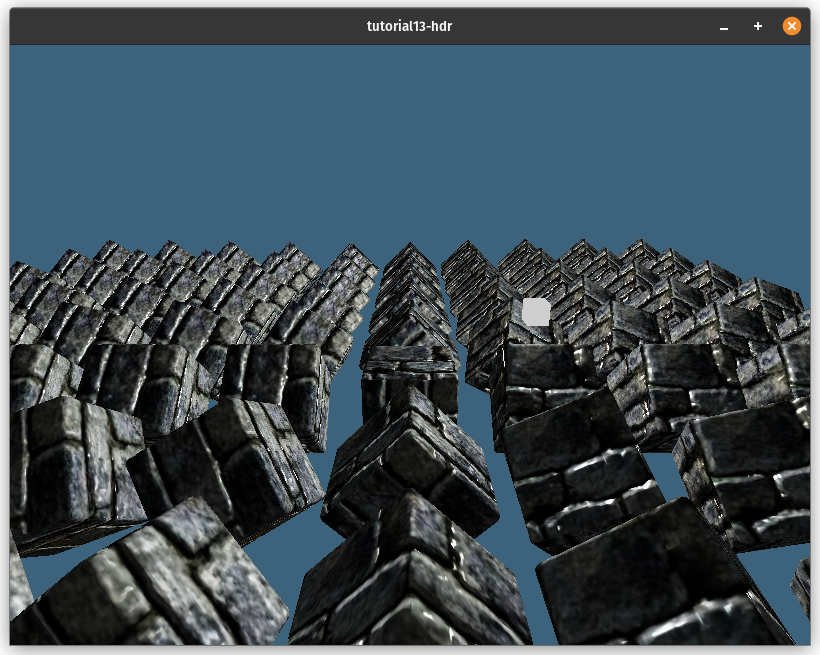
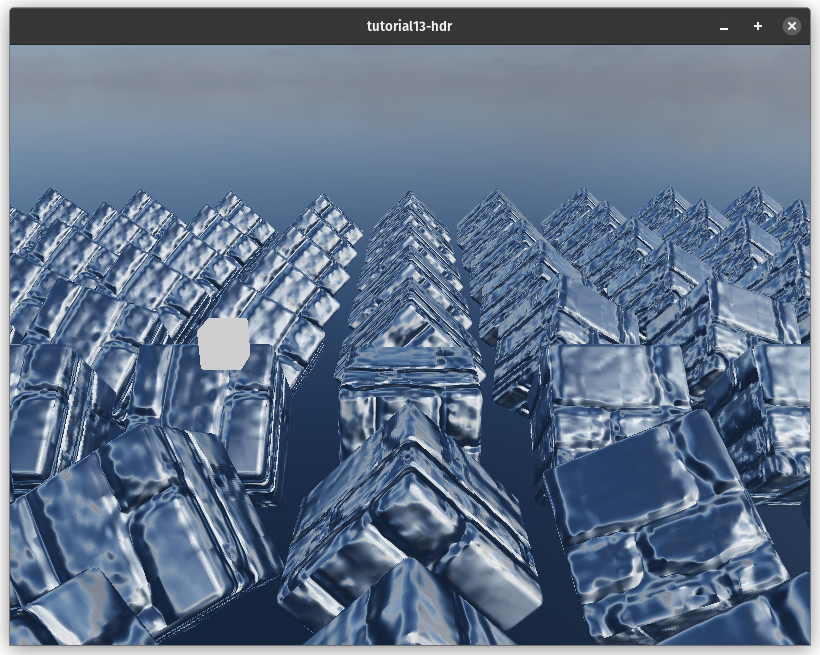
HDR을 구현한 후의 모습입니다:
# HDR 텍스처 로딩하기
이제 HDR 렌더 버퍼가 있으니, HDR 텍스처를 최대한 활용할 수 있습니다. HDR 텍스처의 주요 용도 중 하나는 환경 맵(environment map) 형태로 조명 정보를 저장하는 것입니다.
이 맵은 객체를 비추고, 반사를 표시하며, 스카이박스를 만드는 데 사용될 수 있습니다. HDR 텍스처를 사용하여 스카이박스를 만들 것이지만, 그 전에 환경 맵이 어떻게 저장되는지에 대해 이야기해야 합니다.
# 정거원통도법 텍스처 (Equirectangular textures)
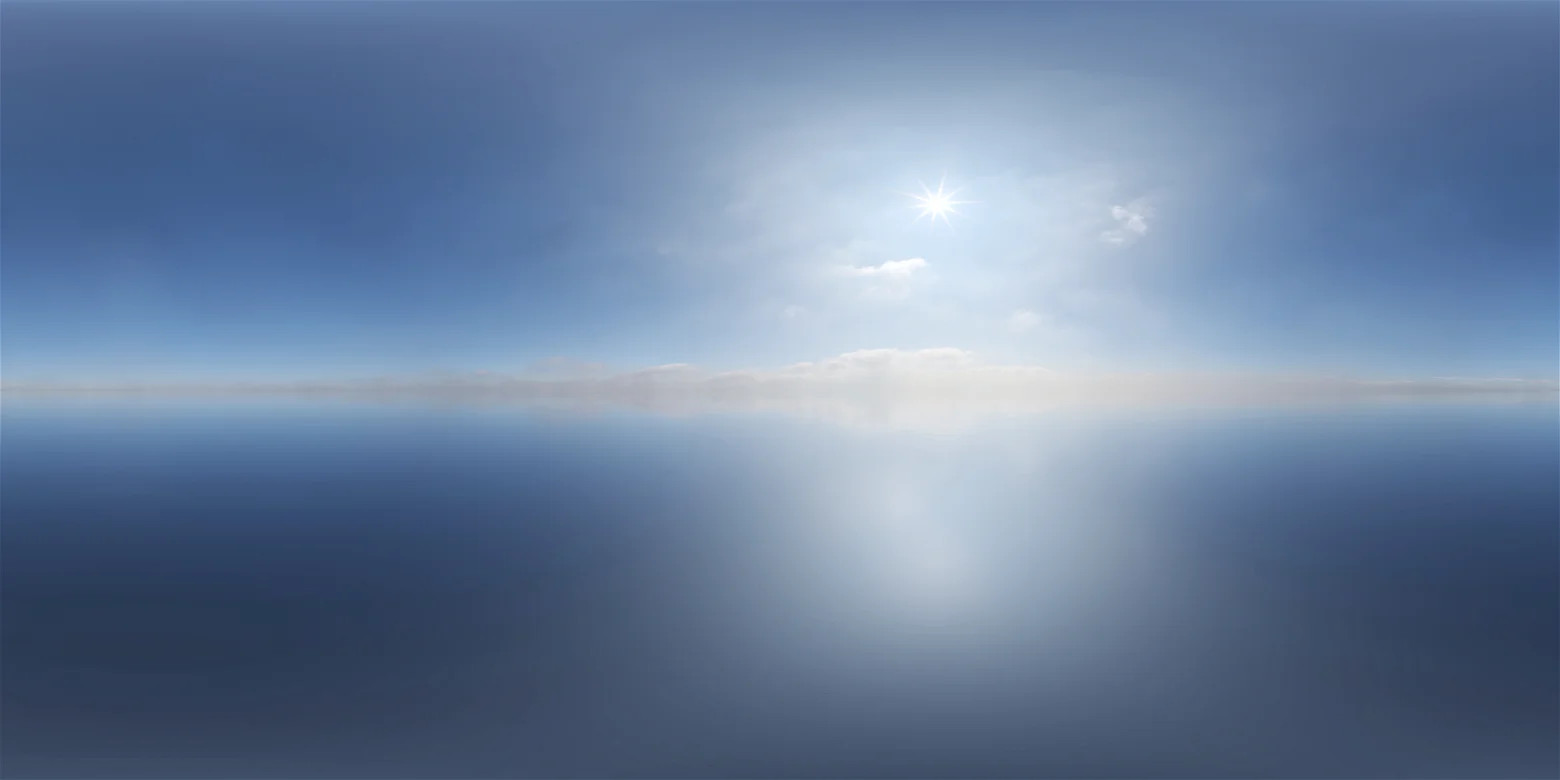
정거원통도법 텍스처는 정거원통도법(equirectangular projection)이라는 것을 사용하여 구를 직사각형 표면에 펼쳐놓은 텍스처입니다. 이 지구 지도는 이 투영법의 한 예입니다.

이 투영법은 구의 경도 값을 텍스처의 수평 좌표에 매핑합니다. 위도 값은 수직 좌표에 매핑됩니다. 이는 텍스처의 수직 중앙이 구의 적도(위도 0°), 수평 중앙이 본초 자오선(경도 0°), 텍스처의 왼쪽과 오른쪽 가장자리가 대척 자오선(경도 +180°/-180°), 텍스처의 위쪽과 아래쪽 가장자리가 각각 북극(위도 90°)과 남극(위도 -90°)이라는 것을 의미합니다.

이 간단한 투영법은 사용하기 쉬워 구형 텍스처를 저장하는 데 가장 인기 있는 투영법 중 하나입니다. 아래에서 우리가 사용할 특정 환경 맵을 볼 수 있습니다.
# 큐브맵 (Cube Maps)
기술적으로는 정거원통도법 맵을 직접 사용할 수 있지만(올바른 좌표를 계산하기 위한 약간의 수학만 한다면), 환경 맵을 큐브맵으로 변환하는 것이 훨씬 편리합니다.
큐브맵은 6개의 레이어를 가진 특별한 종류의 텍스처입니다. 각 레이어는 X, Y, Z 축에 정렬된 가상의 큐브의 다른 면에 해당합니다. 레이어는 +X, -X, +Y, -Y, +Z, -Z 순서로 저장됩니다.
큐브 텍스처를 저장하기 위해 준비하기 위해 texture.rs에 CubeTexture라는 새로운 구조체를 만들겠습니다.
pub struct CubeTexture {
    texture: wgpu::Texture,
    sampler: wgpu::Sampler,
    view: wgpu::TextureView,
}

impl CubeTexture {
    pub fn create_2d(
        device: &wgpu::Device,
        width: u32,
        height: u32,
        format: wgpu::TextureFormat,
        mip_level_count: u32,
        usage: wgpu::TextureUsages,
        mag_filter: wgpu::FilterMode,
        label: Option<&str>,
    ) -> Self {
        let texture = device.create_texture(&wgpu::TextureDescriptor {
            label,
            size: wgpu::Extent3d {
                width,
                height,
                // 큐브는 6개의 면을 가지므로 6개의 레이어가 필요합니다.
                depth_or_array_layers: 6,
            },
            mip_level_count,
            sample_count: 1,
            dimension: wgpu::TextureDimension::D2,
            format,
            usage,
            view_formats: &[],
        });

        let view = texture.create_view(&wgpu::TextureViewDescriptor {
            label,
            dimension: Some(wgpu::TextureViewDimension::Cube),
            array_layer_count: Some(6),
            ..Default::default()
        });

        let sampler = device.create_sampler(&wgpu::SamplerDescriptor {
            label,
            address_mode_u: wgpu::AddressMode::ClampToEdge,
            address_mode_v: wgpu::AddressMode::ClampToEdge,
            address_mode_w: wgpu::AddressMode::ClampToEdge,
            mag_filter,
            min_filter: wgpu::FilterMode::Nearest,
            mipmap_filter: wgpu::FilterMode::Nearest,
            ..Default::default()
        });

        Self {
            texture,
            sampler,
            view,
        }
    }

    pub fn texture(&self) -> &wgpu::Texture { &self.texture }

    pub fn view(&self) -> &wgpu::TextureView { &self.view }

    pub fn sampler(&self) -> &wgpu::Sampler { &self.sampler }

}
이제 HDR을 큐브 텍스처로 로드하는 코드를 작성할 수 있습니다.
# 컴퓨트 셰이더 (Compute shaders)
지금까지는 렌더 파이프라인만 독점적으로 사용했지만, 지금이 컴퓨트 파이프라인과 그 확장인 컴퓨트 셰이더를 소개하기 좋은 시기라고 생각했습니다. 컴퓨트 파이프라인은 설정하기가 훨씬 쉽습니다. 파이프라인에 사용할 리소스, 실행할 코드, 그리고 코드를 실행할 때 GPU가 사용할 스레드 수를 알려주기만 하면 됩니다. 우리는 컴퓨트 셰이더를 사용하여 큐브 텍스처의 각 픽셀에 HDR 이미지의 색상을 부여할 것입니다.
컴퓨트 셰이더를 사용하기 전에 wgpu에서 활성화해야 합니다. 사용하려는 기능을 지정하는 줄을 변경하여 이를 수행할 수 있습니다. lib.rs에서 장치를 요청하는 코드를 변경하세요:
let (device, queue) = adapter
    .request_device(
        &wgpu::DeviceDescriptor {
            label: None,
            // UPDATED!
            features: wgpu::Features::all_webgpu_mask(),
            // UPDATED!
            required_limits: wgpu::Limits::downlevel_defaults(),
        },
        None, // Trace path
    )
    .await
    .unwrap();
downlevel_webgl2_defaults()에서 downlevel_defaults()로 전환한 것을 눈치챘을 것입니다. 이는 WebGL2 지원을 중단한다는 의미입니다. 그 이유는 WebGL2가 컴퓨트 셰이더를 지원하지 않기 때문입니다. WebGPU는 컴퓨트 셰이더를 염두에 두고 만들어졌습니다. 이 글을 쓰는 시점에서 WebGPU를 지원하는 유일한 브라우저는 Chrome과 Firefox Nightly와 같은 일부 실험적인 브라우저뿐입니다.
따라서 Cargo.toml에서 WebGL 기능을 제거할 것입니다. 특히 이 줄입니다:
wgpu = { version = "25.0", features = ["webgl"]}
이제 wgpu에 컴퓨트 셰이더를 사용하겠다고 알렸으니, resource.rs에 HDR 이미지를 큐브맵으로 로드하는 데 사용할 구조체를 만들어 봅시다.
pub struct HdrLoader {
    texture_format: wgpu::TextureFormat,
    equirect_layout: wgpu::BindGroupLayout,
    equirect_to_cubemap: wgpu::ComputePipeline,
}

impl HdrLoader {
    pub fn new(device: &wgpu::Device) -> Self {
        let module = device.create_shader_module(wgpu::include_wgsl!("equirectangular.wgsl"));
        let texture_format = wgpu::TextureFormat::Rgba32Float;
        let equirect_layout = device.create_bind_group_layout(&wgpu::BindGroupLayoutDescriptor {
            label: Some("HdrLoader::equirect_layout"),
            entries: &[
                wgpu::BindGroupLayoutEntry {
                    binding: 0,
                    visibility: wgpu::ShaderStages::COMPUTE,
                    ty: wgpu::BindingType::Texture {
                        sample_type: wgpu::TextureSampleType::Float { filterable: false },
                        view_dimension: wgpu::TextureViewDimension::D2,
                        multisampled: false,
                    },
                    count: None,
                },
                wgpu::BindGroupLayoutEntry {
                    binding: 1,
                    visibility: wgpu::ShaderStages::COMPUTE,
                    ty: wgpu::BindingType::StorageTexture {
                        access: wgpu::StorageTextureAccess::WriteOnly,
                        format: texture_format,
                        view_dimension: wgpu::TextureViewDimension::D2Array,
                    },
                    count: None,
                },
            ],
        });

        let pipeline_layout = device.create_pipeline_layout(&wgpu::PipelineLayoutDescriptor {
            label: None,
            bind_group_layouts: &[&equirect_layout],
            push_constant_ranges: &[],
        });

        let equirect_to_cubemap =
            device.create_compute_pipeline(&wgpu::ComputePipelineDescriptor {
                label: Some("equirect_to_cubemap"),
                layout: Some(&pipeline_layout),
                module: &module,
                entry_point: Some("compute_equirect_to_cubemap"),
                compilation_options: Default::default(),
                cache: None,
            });

        Self {
            equirect_to_cubemap,
            texture_format,
            equirect_layout,
        }
    }

    pub fn from_equirectangular_bytes(
        &self,
        device: &wgpu::Device,
        queue: &wgpu::Queue,
        data: &[u8],
        dst_size: u32,
        label: Option<&str>,
    ) -> anyhow::Result<texture::CubeTexture> {
        let hdr_decoder = HdrDecoder::new(Cursor::new(data))?;
        let meta = hdr_decoder.metadata();

        #[cfg(not(target_arch="wasm32"))]
        let pixels = {
            let mut pixels = vec![[0.0, 0.0, 0.0, 0.0]; meta.width as usize * meta.height as usize];
            hdr_decoder.read_image_transform(
                |pix| {
                    let rgb = pix.to_hdr();
                    [rgb.0[0], rgb.0[1], rgb.0[2], 1.0f32]
                },
                &mut pixels[..],
            )?;
            pixels
        };
        #[cfg(target_arch="wasm32")]
        let pixels = hdr_decoder.read_image_native()?
            .into_iter()
            .map(|pix| {
                let rgb = pix.to_hdr();
                [rgb.0[0], rgb.0[1], rgb.0[2], 1.0f32]
            })
            .collect::<Vec<_>>();

        let src = texture::Texture::create_2d_texture(
            device,
            meta.width,
            meta.height,
            self.texture_format,
            wgpu::TextureUsages::TEXTURE_BINDING | wgpu::TextureUsages::COPY_DST,
            wgpu::FilterMode::Linear,
            None,
        );

        queue.write_texture(
            wgpu::TexelCopyTextureInfo {
                texture: &src.texture,
                mip_level: 0,
                origin: wgpu::Origin3d::ZERO,
                aspect: wgpu::TextureAspect::All,
            },
            &bytemuck::cast_slice(&pixels),
            wgpu::TexelCopyBufferLayout {
                offset: 0,
                bytes_per_row: Some(src.size.width * std::mem::size_of::<[f32; 4]>() as u32),
                rows_per_image: Some(src.size.height),
            },
            src.size,
        );

        let dst = texture::CubeTexture::create_2d(
            device,
            dst_size,
            dst_size,
            self.texture_format,
            1,
            // `dst` 텍스처에 쓸 것이므로
            // `STORAGE_BINDING`을 사용해야 합니다.
            wgpu::TextureUsages::STORAGE_BINDING
                | wgpu::TextureUsages::TEXTURE_BINDING,
            wgpu::FilterMode::Nearest,
            label,
        );

        let dst_view = dst.texture().create_view(&wgpu::TextureViewDescriptor {
            label,
            // 보통 큐브 텍스처에는 `TextureViewDimension::Cube`를
            // 사용하지만, `STORAGE_BINDING`과 함께
            // 해당 뷰 차원을 사용할 수 없습니다.
            // 큐브 텍스처 레이어에 직접 접근해야 합니다.
            dimension: Some(wgpu::TextureViewDimension::D2Array),
            ..Default::default()
        });

        let bind_group = device.create_bind_group(&wgpu::BindGroupDescriptor {
            label,
            layout: &self.equirect_layout,
            entries: &[
                wgpu::BindGroupEntry {
                    binding: 0,
                    resource: wgpu::BindingResource::TextureView(&src.view),
                },
                wgpu::BindGroupEntry {
                    binding: 1,
                    resource: wgpu::BindingResource::TextureView(&dst_view),
                },
            ],
        });

        let mut encoder = device.create_command_encoder(&Default::default());
        let mut pass = encoder.begin_compute_pass(&wgpu::ComputePassDescriptor { label });

        let num_workgroups = (dst_size + 15) / 16;
        pass.set_pipeline(&self.equirect_to_cubemap);
        pass.set_bind_group(0, &bind_group, &[]);
        pass.dispatch_workgroups(num_workgroups, num_workgroups, 6);

        drop(pass);

        queue.submit([encoder.finish()]);

        Ok(dst)
    }
}
dispatch_workgroups 호출은 GPU에게 워크그룹(workgroup)이라는 배치 단위로 코드를 실행하도록 지시합니다. 각 워크그룹에는 인보케이션(invocation)이라고 불리는 여러 작업자 스레드가 있어 코드를 병렬로 실행합니다. 워크그룹은 우리가 dispatch_workgroups에 전달하는 차원을 가진 3D 그리드로 구성됩니다.
이 예제에서는 워크그룹 그리드를 16x16 청크로 나누고 z 차원에 레이어를 저장합니다.
# 컴퓨트 셰이더
이제 정거원통도법 텍스처를 큐브 텍스처로 변환하는 컴퓨트 셰이더를 작성해 보겠습니다. equirectangular.wgsl이라는 파일을 만드세요. 청크별로 나누어 설명하겠습니다.
const PI: f32 = 3.1415926535897932384626433832795;

struct Face {
    forward: vec3<f32>,
    up: vec3<f32>,
    right: vec3<f32>,
}
여기서 두 가지 사항이 있습니다:
- WGSL에는 PI에 대한 내장 상수가 없으므로 직접 지정해야 합니다.
- 큐브맵의 각 면에는 방향성이 있으므로 이를 저장해야 합니다.
@group(0)
@binding(0)
var src: texture_2d<f32>;

@group(0)
@binding(1)
var dst: texture_storage_2d_array<rgba32float, write>;
여기에는 필요한 두 개의 바인딩만 있습니다. 정거원통도법 src 텍스처와 dst 큐브 텍스처입니다. dst에 대해 주목할 몇 가지 사항:
dst는 큐브 텍스처이지만, 2D 텍스처 배열로 저장됩니다.- 여기서 사용하는 바인딩 유형은 스토리지 텍스처(storage texture)입니다. 정확히는 배열 스토리지 텍스처입니다. 이는 컴퓨트 셰이더에서만 사용할 수 있는 고유한 바인딩으로, 텍스처에 직접 쓸 수 있게 해줍니다.
- 스토리지 텍스처 바인딩을 사용할 때는 텍스처의 포맷을 지정해야 합니다. 다른 포맷의 텍스처를 바인딩하려고 하면 wgpu가 패닉을 일으킵니다.
@compute
@workgroup_size(16, 16, 1)
fn compute_equirect_to_cubemap(
    @builtin(global_invocation_id)
    gid: vec3<u32>,
) {
    // 텍스처 크기가 32로 나누어 떨어지지 않으면,
    // 존재하지 않는 픽셀에 쓰려고 시도하지 않도록
    // 해야 합니다.
    if gid.x >= u32(textureDimensions(dst).x) {
        return;
    }

    var FACES: array<Face, 6> = array(
        // FACES +X
        Face(
            vec3(1.0, 0.0, 0.0),  // forward
            vec3(0.0, 1.0, 0.0),  // up
            vec3(0.0, 0.0, -1.0), // right
        ),
        // FACES -X
        Face (
            vec3(-1.0, 0.0, 0.0),
            vec3(0.0, 1.0, 0.0),
            vec3(0.0, 0.0, 1.0),
        ),
        // FACES +Y
        Face (
            vec3(0.0, -1.0, 0.0),
            vec3(0.0, 0.0, 1.0),
            vec3(1.0, 0.0, 0.0),
        ),
        // FACES -Y
        Face (
            vec3(0.0, 1.0, 0.0),
            vec3(0.0, 0.0, -1.0),
            vec3(1.0, 0.0, 0.0),
        ),
        // FACES +Z
        Face (
            vec3(0.0, 0.0, 1.0),
            vec3(0.0, 1.0, 0.0),
            vec3(1.0, 0.0, 0.0),
        ),
        // FACES -Z
        Face (
            vec3(0.0, 0.0, -1.0),
            vec3(0.0, 1.0, 0.0),
            vec3(-1.0, 0.0, 0.0),
        ),
    );

    // 큐브맵 면에 상대적인 텍스처 좌표 얻기
    let dst_dimensions = vec2<f32>(textureDimensions(dst));
    let cube_uv = vec2<f32>(gid.xy) / dst_dimensions * 2.0 - 1.0;

    // cube_uv로부터 구면 좌표 얻기
    let face = FACES[gid.z];
    let spherical = normalize(face.forward + face.right * cube_uv.x + face.up * cube_uv.y);

    // 정거원통도법 텍스처 상의 좌표 얻기
    let inv_atan = vec2(0.1591, 0.3183);
    let eq_uv = vec2(atan2(spherical.z, spherical.x), asin(spherical.y)) * inv_atan + 0.5;
    let eq_pixel = vec2<i32>(eq_uv * vec2<f32>(textureDimensions(src)));

    // textureSample()은 컴퓨트 셰이더에서 허용되지 않으므로 textureLoad()를 사용합니다.
    var sample = textureLoad(src, eq_pixel, 0);

    textureStore(dst, gid.xy, gid.z, sample);
}
이전 코드에 주석을 달았지만, 주석에 잘 맞지 않는 몇 가지 사항을 짚고 넘어가고 싶습니다.
workgroup_size 데코레이터는 워크그룹의 로컬 인보케이션 그리드 차원을 알려줍니다. 텍스처의 모든 픽셀에 대해 하나의 워크그룹을 디스패치하므로, 각 워크그룹은 16x16x1 그리드가 됩니다. 이는 각 워크그룹이 256개의 스레드를 가질 수 있다는 의미입니다.
WebGPU의 경우, 각 워크그룹은 최대 256개의 스레드(인보케이션이라고도 함)만 가질 수 있습니다.
이제 new() 함수에서 환경 맵을 로드할 수 있습니다:
let hdr_loader = resources::HdrLoader::new(&device);
let sky_bytes = resources::load_binary("pure-sky.hdr").await?;
let sky_texture = hdr_loader.from_equirectangular_bytes(
    &device,
    &queue,
    &sky_bytes,
    1080,
    Some("Sky Texture"),
)?;
# 스카이박스 (Skybox)
이제 렌더링할 환경 맵이 있으니, 이를 사용하여 스카이박스를 만들어 봅시다. 스카이박스를 렌더링하는 방법은 여러 가지가 있습니다. 표준적인 방법은 큐브를 렌더링하고 그 위에 환경 맵을 매핑하는 것입니다. 이 방법도 작동하지만, 큐브의 면이 만나는 모서리와 가장자리에서 일부 아티팩트가 발생할 수 있습니다.
대신, 우리는 전체 화면에 렌더링하고, 각 픽셀에서 뷰 방향을 계산하여 텍스처를 샘플링할 것입니다. 먼저, 렌더링에 사용할 수 있도록 환경 맵에 대한 바인드그룹을 만들어야 합니다. new()에 다음을 추가하세요:
let environment_layout =
    device.create_bind_group_layout(&wgpu::BindGroupLayoutDescriptor {
        label: Some("environment_layout"),
        entries: &[
            wgpu::BindGroupLayoutEntry {
                binding: 0,
                visibility: wgpu::ShaderStages::FRAGMENT,
                ty: wgpu::BindingType::Texture {
                    sample_type: wgpu::TextureSampleType::Float { filterable: false },
                    view_dimension: wgpu::TextureViewDimension::Cube,
                    multisampled: false,
                },
                count: None,
            },
            wgpu::BindGroupLayoutEntry {
                binding: 1,
                visibility: wgpu::ShaderStages::FRAGMENT,
                ty: wgpu::BindingType::Sampler(wgpu::SamplerBindingType::NonFiltering),
                count: None,
            },
        ],
    });

let environment_bind_group = device.create_bind_group(&wgpu::BindGroupDescriptor {
    label: Some("environment_bind_group"),
    layout: &environment_layout,
    entries: &[
        wgpu::BindGroupEntry {
            binding: 0,
            resource: wgpu::BindingResource::TextureView(&sky_texture.view()),
        },
        wgpu::BindGroupEntry {
            binding: 1,
            resource: wgpu::BindingResource::Sampler(sky_texture.sampler()),
        },
    ],
});
이제 바인드그룹이 있으니, 스카이박스를 렌더링할 렌더 파이프라인이 필요합니다.
// NEW!
let sky_pipeline = {
    let layout = device.create_pipeline_layout(&wgpu::PipelineLayoutDescriptor {
        label: Some("Sky Pipeline Layout"),
        bind_group_layouts: &[&camera_bind_group_layout, &environment_layout],
        push_constant_ranges: &[],
    });
    let shader = wgpu::include_wgsl!("sky.wgsl");
    create_render_pipeline(
        &device,
        &layout,
        hdr.format(),
        Some(texture::Texture::DEPTH_FORMAT),
        &[],
        wgpu::PrimitiveTopology::TriangleList,
        shader,
    )
};
여기서 주목할 점이 하나 있습니다. create_render_pipeline()에 프리미티브 포맷을 추가했습니다. 또한, 깊이 비교 함수를 CompareFunction::LessEqual로 변경했습니다 (왜 그런지는 스카이 셰이더를 다룰 때 논의할 것입니다). 해당 변경 사항은 다음과 같습니다:
fn create_render_pipeline(
    device: &wgpu::Device,
    layout: &wgpu::PipelineLayout,
    color_format: wgpu::TextureFormat,
    depth_format: Option<wgpu::TextureFormat>,
    vertex_layouts: &[wgpu::VertexBufferLayout],
    topology: wgpu::PrimitiveTopology, // NEW!
    shader: wgpu::ShaderModuleDescriptor,
) -> wgpu::RenderPipeline {
    let shader = device.create_shader_module(shader);

    device.create_render_pipeline(&wgpu::RenderPipelineDescriptor {
        // ...
        primitive: wgpu::PrimitiveState {
            topology, // NEW!
            // ...
        },
        depth_stencil: depth_format.map(|format| wgpu::DepthStencilState {
            format,
            depth_write_enabled: true,
            depth_compare: wgpu::CompareFunction::LessEqual, // UDPATED!
            stencil: wgpu::StencilState::default(),
            bias: wgpu::DepthBiasState::default(),
        }),
        // ...
    })
}
새로운 바인드그룹과 파이프라인을 State에 추가하는 것을 잊지 마세요.
pub struct State {
    // ...
    // NEW!
    hdr: hdr::HdrPipeline,
    environment_bind_group: wgpu::BindGroup,
    sky_pipeline: wgpu::RenderPipeline,
}

// ...
impl State {
    async fn new(window: Arc<Window>) -> anyhow::Result<State> {
        // ...
        Ok(Self {
            // ...
            // NEW!
            hdr,
            environment_bind_group,
            sky_pipeline,
            debug,
        })
    }
}
이제 sky.wgsl을 다루어 봅시다.
struct Camera {
    view_pos: vec4<f32>,
    view: mat4x4<f32>,
    view_proj: mat4x4<f32>,
    inv_proj: mat4x4<f32>,
    inv_view: mat4x4<f32>,
}
@group(0) @binding(0)
var<uniform> camera: Camera;

@group(1)
@binding(0)
var env_map: texture_cube<f32>;
@group(1)
@binding(1)
var env_sampler: sampler;

struct VertexOutput {
    @builtin(position) frag_position: vec4<f32>,
    @location(0) clip_position: vec4<f32>,
}

@vertex
fn vs_main(
    @builtin(vertex_index) id: u32,
) -> VertexOutput {
    let uv = vec2<f32>(vec2<u32>(
        id & 1u,
        (id >> 1u) & 1u,
    ));
    var out: VertexOutput;
    // out.clip_position = vec4(uv * vec2(4.0, -4.0) + vec2(-1.0, 1.0), 0.0, 1.0);
    out.clip_position = vec4(uv * 4.0 - 1.0, 1.0, 1.0);
    out.frag_position = vec4(uv * 4.0 - 1.0, 1.0, 1.0);
    return out;
}

@fragment
fn fs_main(in: VertexOutput) -> @location(0) vec4<f32> {
    let view_pos_homogeneous = camera.inv_proj * in.clip_position;
    let view_ray_direction = view_pos_homogeneous.xyz / view_pos_homogeneous.w;
    var ray_direction = normalize((camera.inv_view * vec4(view_ray_direction, 0.0)).xyz);

    let sample = textureSample(env_map, env_sampler, ray_direction);
    return sample;
}
이것을 분석해 봅시다:
- 화면 크기의 두 배인 삼각형을 만듭니다.
- 프래그먼트 셰이더에서 클립 위치로부터 뷰 방향을 얻습니다. 역 투영 행렬을 사용하여 클립 좌표를 뷰 방향으로 변환합니다. 그런 다음, 역 뷰 행렬을 사용하여 방향을 월드 공간으로 변환합니다. 스카이 박스를 올바르게 샘플링하려면 월드 공간이 필요하기 때문입니다.
- 그런 다음 뷰 방향으로 스카이 텍스처를 샘플링합니다.
이것이 작동하려면 카메라 유니폼을 약간 변경해야 합니다. CameraUniform 구조체에 역 뷰 행렬과 역 투영 행렬을 추가해야 합니다.
#[repr(C)]
#[derive(Copy, Clone, bytemuck::Pod, bytemuck::Zeroable)]
struct CameraUniform {
    view_position: [f32; 4],
    view: [[f32; 4]; 4], // NEW!
    view_proj: [[f32; 4]; 4],
    inv_proj: [[f32; 4]; 4], // NEW!
    inv_view: [[f32; 4]; 4], // NEW!
}

impl CameraUniform {
    fn new() -> Self {
        Self {
            view_position: [0.0; 4],
            view: cgmath::Matrix4::identity().into(),
            view_proj: cgmath::Matrix4::identity().into(),
            inv_proj: cgmath::Matrix4::identity().into(), // NEW!
            inv_view: cgmath::Matrix4::identity().into(), // NEW!
        }
    }

    // UPDATED!
    fn update_view_proj(&mut self, camera: &camera::Camera, projection: &camera::Projection) {
        self.view_position = camera.position.to_homogeneous().into();
        let proj = projection.calc_matrix();
        let view = camera.calc_matrix();
        let view_proj = proj * view;
        self.view = view.into();
        self.view_proj = view_proj.into();
        self.inv_proj = proj.invert().unwrap().into();
        self.inv_view = view.transpose().into();
    }
}
shader.wgsl과 light.wgsl에서 Camera 정의를 변경하는 것을 잊지 마세요. 참고로, 다음과 같이 생겼습니다:
struct Camera {
    view_pos: vec4<f32>,
    view: mat4x4<f32>,
    view_proj: mat4x4<f32>,
    inv_proj: mat4x4<f32>,
    inv_view: mat4x4<f32>,
}
var<uniform> camera: Camera;
OPENGL_TO_WGPU_MATRIX를 제거한 것을 눈치채셨을 겁니다. 그 이유는 스카이박스의 투영을 망가뜨리고 있었기 때문입니다.
기술적으로 필요하지 않았기 때문에 제거하는 것이 괜찮다고 생각했습니다.
# 반사 (Reflections)
이제 하늘이 생겼으니, 이를 조명에 사용하는 것을 시도해 볼 수 있습니다. 이것은 물리적으로 정확하지는 않을 것입니다(나중에 그것에 대해 알아볼 것입니다). 그럼에도 불구하고 환경 맵이 있으니 사용하는 것이 좋겠습니다.
하지만 그렇게 하려면, 우리의 환경 맵이 월드 공간에 있기 때문에 셰이더를 탄젠트 공간 대신 월드 공간에서 조명을 수행하도록 변경해야 합니다. 많은 변경 사항이 있으므로 여기에 전체 셰이더를 게시하겠습니다:
// Vertex shader

struct Camera {
    view_pos: vec4<f32>,
    view: mat4x4<f32>,
    view_proj: mat4x4<f32>,
    inv_proj: mat4x4<f32>,
    inv_view: mat4x4<f32>,
}
@group(0) @binding(0)
var<uniform> camera: Camera;

struct Light {
    position: vec3<f32>,
    color: vec3<f32>,
}
@group(2) @binding(0)
var<uniform> light: Light;

struct VertexInput {
    @location(0) position: vec3<f32>,
    @location(1) tex_coords: vec2<f32>,
    @location(2) normal: vec3<f32>,
    @location(3) tangent: vec3<f32>,
    @location(4) bitangent: vec3<f32>,
}
struct InstanceInput {
    @location(5) model_matrix_0: vec4<f32>,
    @location(6) model_matrix_1: vec4<f32>,
    @location(7) model_matrix_2: vec4<f32>,
    @location(8) model_matrix_3: vec4<f32>,
    @location(9) normal_matrix_0: vec3<f32>,
    @location(10) normal_matrix_1: vec3<f32>,
    @location(11) normal_matrix_2: vec3<f32>,
}

struct VertexOutput {
    @builtin(position) clip_position: vec4<f32>,
    @location(0) tex_coords: vec2<f32>,
    // Updated!
    @location(1) world_position: vec3<f32>,
    @location(2) world_view_position: vec3<f32>,
    @location(3) world_light_position: vec3<f32>,
    @location(4) world_normal: vec3<f32>,
    @location(5) world_tangent: vec3<f32>,
    @location(6) world_bitangent: vec3<f32>,
}

@vertex
fn vs_main(
    model: VertexInput,
    instance: InstanceInput,
) -> VertexOutput {
    let model_matrix = mat4x4<f32>(
        instance.model_matrix_0,
        instance.model_matrix_1,
        instance.model_matrix_2,
        instance.model_matrix_3,
    );
    let normal_matrix = mat3x3<f32>(
        instance.normal_matrix_0,
        instance.normal_matrix_1,
        instance.normal_matrix_2,
    );

    // UPDATED!
    let world_position = model_matrix * vec4<f32>(model.position, 1.0);

    var out: VertexOutput;
    out.clip_position = camera.view_proj * world_position;
    out.tex_coords = model.tex_coords;
    out.world_normal = normalize(normal_matrix * model.normal);
    out.world_tangent = normalize(normal_matrix * model.tangent);
    out.world_bitangent = normalize(normal_matrix * model.bitangent);
    out.world_position = world_position.xyz;
    out.world_view_position = camera.view_pos.xyz;
    return out;
}

// Fragment shader

@group(0) @binding(0)
var t_diffuse: texture_2d<f32>;
@group(0)@binding(1)
var s_diffuse: sampler;
@group(0)@binding(2)
var t_normal: texture_2d<f32>;
@group(0) @binding(3)
var s_normal: sampler;

@group(3)
@binding(0)
var env_map: texture_cube<f32>;
@group(3)
@binding(1)
var env_sampler: sampler;

@fragment
fn fs_main(in: VertexOutput) -> @location(0) vec4<f32> {
    let object_color: vec4<f32> = textureSample(t_diffuse, s_diffuse, in.tex_coords);
    let object_normal: vec4<f32> = textureSample(t_normal, s_normal, in.tex_coords);

    // NEW!
    // 그람-슈미트 직교화 과정을 사용하여 탄젠트와 바이탄젠트를 조정합니다.
    // 이것은 이들이 서로 수직이고 표면의 노멀과도 수직임을 보장합니다.
    let world_tangent = normalize(in.world_tangent - dot(in.world_tangent, in.world_normal) * in.world_normal);
    let world_bitangent = cross(world_tangent, in.world_normal);

    // 노멀 샘플을 월드 공간으로 변환합니다.
    let TBN = mat3x3(
        world_tangent,
        world_bitangent,
        in.world_normal,
    );
    let tangent_normal = object_normal.xyz * 2.0 - 1.0;
    let world_normal = TBN * tangent_normal;

    // 조명 벡터를 생성합니다.
    let light_dir = normalize(light.position - in.world_position);
    let view_dir = normalize(in.world_view_position - in.world_position);
    let half_dir = normalize(view_dir + light_dir);

    let diffuse_strength = max(dot(world_normal, light_dir), 0.0);
    let diffuse_color = light.color * diffuse_strength;

    let specular_strength = pow(max(dot(world_normal, half_dir), 0.0), 32.0);
    let specular_color = specular_strength * light.color;

    // NEW!
    // 반사 계산
    let world_reflect = reflect(-view_dir, world_normal);
    let reflection = textureSample(env_map, env_sampler, world_reflect).rgb;
    let shininess = 0.1;

    let result = (diffuse_color + specular_color) * object_color.xyz + reflection * shininess;

    return vec4<f32>(result, object_color.a);
}
반사 수학에 대한 약간의 참고 사항입니다. view_dir는 표면에서 카메라로의 방향을 제공합니다. 반사 수학은 카메라에서 표면으로의 방향이 필요하므로 view_dir를 부정합니다. 그런 다음 wgsl의 내장 reflect 함수를 사용하여 반전된 view_dir를 world_normal에 대해 반사시킵니다. 이것은 환경 맵을 샘플링하고 해당 방향의 하늘 색상을 얻는 데 사용할 수 있는 방향을 제공합니다. 반사 구성 요소만 보면 다음과 같습니다:
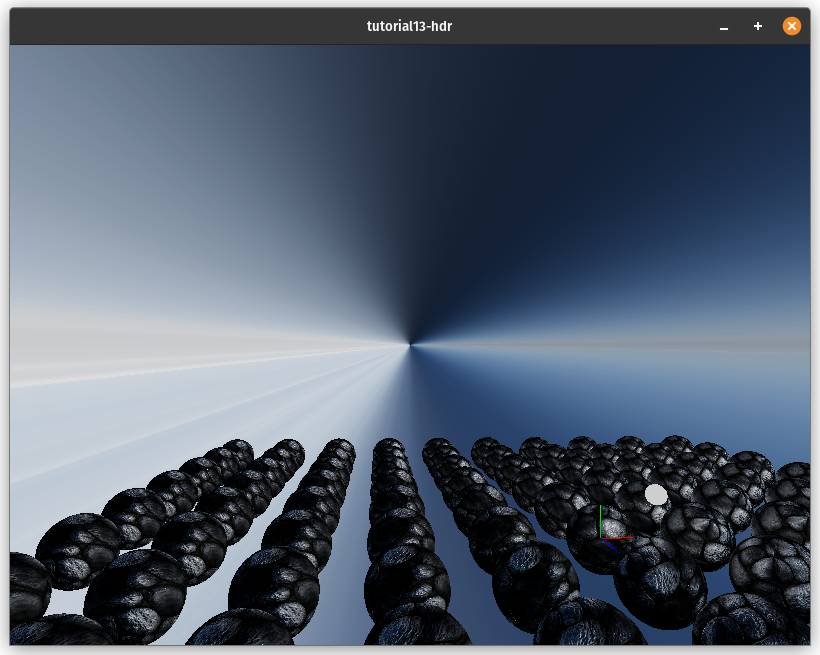
완성된 씬입니다:

# WebGPU에서 출력이 너무 어두운가요?
WebGPU는 서피스(surface)의 출력으로 sRGB 텍스처 포맷을 사용하는 것을 지원하지 않습니다. 렌더링에 사용되는 텍스처 뷰가 포맷의 sRGB 버전을 사용하도록 하여 이 문제를 해결할 수 있습니다. 이를 위해 sRGB를 사용하는 뷰 포맷을 허용하도록 서피스 구성을 변경해야 합니다.
let config = wgpu::SurfaceConfiguration {
    usage: wgpu::TextureUsages::RENDER_ATTACHMENT,
    format: surface_format,
    width: size.width,
    height: size.height,
    present_mode: surface_caps.present_modes[0],
    alpha_mode: surface_caps.alpha_modes[0],
    // NEW!
    view_formats: vec![surface_format.add_srgb_suffix()],
    desired_maximum_frame_latency: 2,
};
그런 다음 State::render()에서 sRGB가 활성화된 뷰를 생성해야 합니다.
let view = output
    .texture
    .create_view(&wgpu::TextureViewDescriptor {
        format: Some(self.config.format.add_srgb_suffix()),
        ..Default::default()
    });
또한 HdrPipeline::new()에서 렌더 파이프라인을 생성할 때 config.format.add_srgb_suffix()를 사용하는 것을 눈치챘을 것입니다. sRGB가 활성화된 TextureView가 렌더 파이프라인과 작동하지 않으므로 이것이 필요합니다.
이렇게 하면 sRGB 출력을 예상대로 얻을 수 있습니다.
# 데모
브라우저가 WebGPU를 지원하지 않으면 이 예제는 작동하지 않습니다.